


i7 Hotend Heating Assembly for Creality
No se pudo cargar la disponibilidad para recoger
Utilice este texto para fomentar la comunicación o promover el intercambio en las redes sociales.
【Creality Official Replacement】- This is a genuine Creality Hotend Heating Assembly, precision-molded for a perfect fit on the SPARKX i7 heater block. Direct replacement for the original part—no modifications needed.
【50W High-Power Heating】- Rated at 50W, this heating assembly dramatically reduces preheat wait times compared to standard 40W/30W heaters. Supports high-flow printing and stable operation at up to 300°C, compatible with PLA, PETG, ABS, ASA, PC, and more.
【Integrated One-Piece Metal Structure】- Made of high-thermal-conductivity aluminum alloy and stainless steel. Maximizes heat transfer efficiency, ensures stable temperature control, and reduces risks of filament leakage or clogging.
【Durable Heating Core with Nickel-Chromium Alloy】- Internally uses 2080 nickel-chromium heating wire encased in a 304 stainless steel sheath. Resists oxidation and high-temperature aging, offering long service life for continuous, demanding print jobs.
【Easy Installation and Quick Replacement】- Engineered for SPARKX i7's 3-second hot-swap system. Floating positioning with 0.05mm repeatability allows safe hot-swap at 220°C.
Replace i7 Hotend Heating Assembly
The replacement procedure is relatively complex. We strongly recommend watching the full video guide or carefully reviewing this Wiki before proceeding. As the Heating Assembly and the Part Cooling Fan Assembly are related, the replacement of both components can be carried out by referring to this video guide.
Hotend Heating Assembly
The Hotend Heating Assembly is the component that heats the hotend. It transfers heat to the hotend through direct contact, melting the filament, which is then extruded by the extruder.
In this guide, we will explain how to replace the Hotend Heating Assembly for the i7 series.
When to Replace
The Hotend Heating Assembly is malfunctioning.
The Heating Assembly is damaged or its thermal insulation degrades quickly.
Replacement is recommended by Creality after-sales support.
Safety Precautions
Turn off the power and unplug the power cord.
Before starting, check the temperatures of the hotend and heated bed. Avoid operating while they are hot to prevent burns from accidental contact.
Required Tool
- H2.0 hexagonal wrench
- Tweezers
Safety Precautions
Turn off the power and unplug the power cord.
Before starting, check the temperatures of the hotend and heated bed. Avoid operating while they are hot to prevent burns from accidental contact.
Procedure
For easier handling, it is recommended to remove the toolhead before replacing the Heating Assembly. The replacement will follow the steps for disassembling the toolhead.
Removing the Toolhead
Remove the PTFE tube from the Filament Hub by gently pressing down the connector and pulling out the tube.
Remove the toolhead front cover, then remove the hotend sock and the quick-release hotend. Be careful not to operate while hot to avoid burns.
Unscrew the two screws on top of the toolhead and disconnect the toolhead cable.
Unscrew the four screws on both sides of the toolhead to remove the entire toolhead, allowing access for the following steps.

Remove the Toolhead Rear Housi
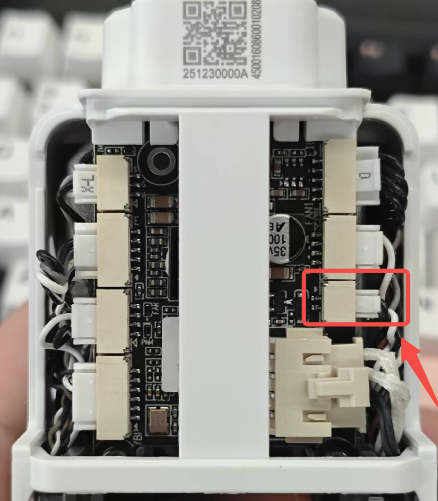
Remove the Toolhead Back Cover to expose the Toolhead Board. As shown in the figure, unplug the connector corresponding to the Extruder Cooling Fan.
Use the H2.0 hex wrench to unscrew the two screws on both sides of the Toolhead Rear Housing, then lift and remove the Toolhead Rear Housing.

Removing the Hotend Heating Assembly and Part Cooling Fan Assembly
As shown in the figure, unplug the connectors of the Part Cooling Fan Assembly and the Hotend Heating Assembly, and carefully remove the cables from the cable channels.
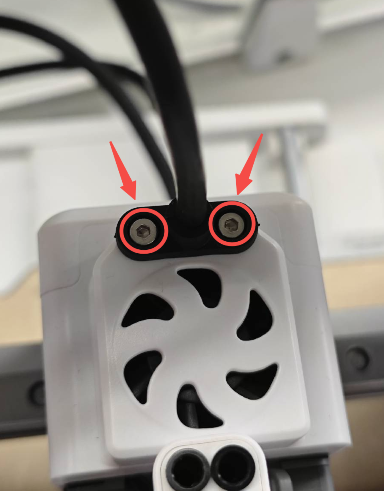
 Unscrew the two screws on the back of the Hotend Heating Assembly to release it.Unscrew the two screws on both sides of the Part Cooling Fan Assembly to release the fan.

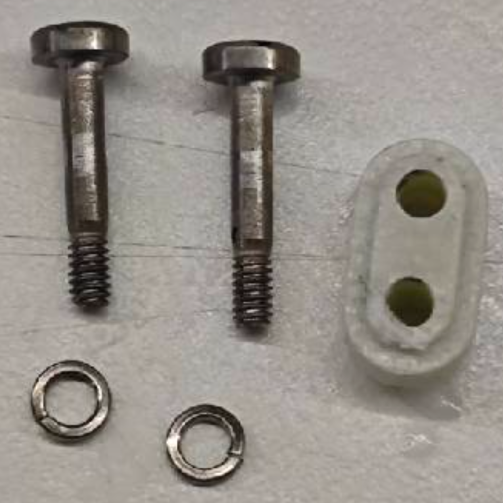
With both the Hotend Heating Assembly and the Part Cooling Fan Assembly loosened, you can more easily remove the Hotend Heating Assembly. Note: Do not lose the insulation block or the screw washers of the Heating Assembly.
Installing the New Hotend Heating Assembly
Route the Part Cooling Fan Assembly cable back through the side hole and organize the wires neatly.
Prepare the new Hotend Heating Assembly, first pass its cable through the side hole. Make sure the cables for both the Heating Assembly and the Part Cooling Fan Assembly are properly arranged, and do not forget to install the insulation block.

Secure the Part Cooling Fan Assembly and the Heating Assembly with screws. Do not fully tighten the screws of the Heating Assembly yet.
Insert the quick-release hotend back onto the toolhead and snap the latch to ensure it is properly seated. Then fully tighten the two screws of the Heating Assembly.

Arrange the cables of the fan and Heating Assembly neatly in the cable channels, and plug them into the corresponding connectors on the Toolhead Board.

Reinstall the Toolhead Rear Housing, reconnect the Extruder Cooling Fan connector, secure the rear housing with screws, and snap the Toolhead Back Cover into place.
Reinstalling the Toolhead onto the Printer
Mount the toolhead back onto the X-axis of the i7 and secure it with screws.

Reinstall the hotend sock and the toolhead front cover to complete all replacement steps.