
Kate. G - July 20 2024
How to Update The Firmware of Neptune 4 Plus & Max

Note 1:
1. This product does not support updating the official Klipper, Moonraker, fluidd and otherservers, otherwise the machine will not work properly. If you consider installing more officialKlipper plug-ins on your own, expanding more functions, learning the underlying logic of thesoftware, before that, it is recommended that you get your own EMMC ADAPTER in order toavoid reinstallation of the system image to restore the machine when an error occurs.Imageinstallation method:
2. If you encounter a situation where your machine does not start properly, please try totroubleshoot the problem according to the FAQ.
File Description
1. Touch Screen Firmware

The ".tft" suffix file is the touch screen firmwarefile: To upgrade the touch screen firmware, you need to use a TF card. Copy the file to the root directory of the TF card, then insert the TF card into the internal card slot of the touch screen, and re-power on to update. Please refer to the following for detailed steps.
2. Main Control Software and Machine Configuration Files

"ELEGOO UPDATE DIR" folder:
This is the folder where the main control software and machine configuration files are stored, and itis an important folder for upgrading the maincontrol. Please select the corresponding upgradefolder according your machine model. Fordetailed upgrade steps the.following, lt includes a software upgrade package,and a machine basic configuration file, described as follows.
Master Control Software Update
Preparation: Copy the Upgrade Folder to the root directory of the Udisk.
Insert the U disk that comes with the machine into the computer, and copy the"ELEGOO_UPDATE_DIR" folder of the corresponding machine to the root directory of the U disk.

Update method 1: Upgrade by using the touch screen control.
When the machine is turned on normally, insert the U disk with the 【Upgrade Folder】into theUSB port of the printer panel (Diagram 1-1), and wait for the U disk to be read successfully(Diagram 1-2, on the page of selecting files to print, check whether the file and folder informationof the U disk can be read. If so, the U disk is mounted successfully.), then click【Settings】→【Information】on the main interface, click the upgrade button arrow on the information page(Diagram 1-3), and click confirm follow the prompt steps, and then upgrade the software. Afterthe upgrade is successful, the machine will automatically restart. After machine restarting, pleasecheck whether the firmware version number has changed.


If an error message is displayed, please follow the instructions below to check.
① Check whether the U disk file is normal, use a computer to check whether the "ELEGOO_UPDATE_DIR" folder in the U disk contains the upgrade software package and machineconfiguration files.
② Check whether the U disk is read normally, and perform the operation again according to the
steps.
③ Re-insert and unplug the U disk or replace the U disk, and perform the operation again.
④Restart the machine and try again. If it cannot be restarted, please troubleshoot the problemaccording to FAQ-2.
Touch Screen Firmware Update
Kind Reminder:When the machine is normally used, it is recommended to updatethe main control software first, and then update the touch screen firmware. If thefirmware version of the touch screen is the same as that of your machine, there is noneed to update it again.
Update steps:
1. Format the TF card. (To upgrade the touch screen firmware, you need to formatthe TF card as required)
Get the given away random TF card and format it as:
File system (F): FAT32, Allocation unit size (A):4096 bytes
2. Copy the touch screen firmware file under the "UI_4&4Pro-Universal firmware" folder to theroot directory of the TF card, as shown in the diagram.

3. Loosen the screws and remove the rear cover of the screen; pay attention to the direction of the card insertion and insert the TF card.

4. Unplug the touch screen plug (or restart the power supply), and wait until the firmware isloaded. The firmware loading process and the completed interface display are shown in thediagram. After the loading is completed, the TF card must be removed first and then restart the machine. (Time required for touch screen firmware update: about 90 seconds)

Update method 2: Use the serial port terminal to perform the Linux
background upgrade:
Note: This upgrade method applies to the situation where the screen cannot run and cannotenter the upgrade interface from the screen.The operation is relatively complicated, and you need to prepare a Type-C data cable. You areadvised to troubleshoot problems according to FAQ-2 before using this method. The method steps are as follows:
Steps are as below:
1. Download and install the serial communication software putty. URL:https://putty.org/

2.. Download and install the ch340 driver. URL:https://sparks.gogo.co.nz/ch340.html
3. Connect the Type-C port of the communication panel of the printer with a Type-C cable, andconnect the other port to the computer USB.
4. Check the corresponding COM port in the computer device manager.

5) After opening putty, select the serial port mode to connect, and click Open.

(6) After clicking Enter several times, you will be prompted to log in, enter the user name and password, user name: mks, and password: makerbase. (The entered password is not visible, justclick Enter after normal input)

(7) Insert the upgrade U disk with prepared files and folders into the USB port of the printer.Run the upgrade script and enter the command. Enter the command "sudo + space + ./update.sh", as shown below, there must be a space character, otherwise it will feedback~bash:sudo . /update.sh: No such file or directory.
When prompted for a password, enter the password "makerbase" and press enter.
(8) Wait for the upgrade to complete. The upgrade completion status is shown as below.

(9) Just restart the machine after 30 seconds of power failure.
Neptune4Plus&4Max Image Installation Method
Prepare the tools:

EMMC ADAPTER (Self-purchase)
EMMC module from the motherboard
Raspberry Pi Imager:https://www.raspberrypi.com/software/
Image Download Site:(Do not provide a link, please contact technical support to obtain!)
GitHub:
https://github.com/NARUTOfzr/neptune4plus_4max_klipper_images/releases/tag/Neptune4plus _4max_images
Baidu Pan:
1. Image installation steps:
① Install the Raspberry Pi Imager
② Decompress the downloaded Image compressed package, get the system Image file with .imgsuffix.
③ Connect the EMMC module to the computer and make sure it can be read normally.
④Connect the EMMC module to the computer and make sure it can be read normally.
⑤Open the installed Raspberry Pi Imager.
⑥ Click [CHOOSE OS], select [Use custom], and choose the system Image file.
⑦ Click [CHOOSE STORAGE], and select the USB storage device you just inserted
⑧ Click [WRITE]
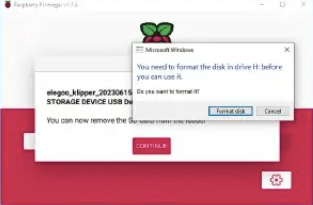
⑨Wait for the writing and verification is complete.
Tip: After the completion of the verification may prompt the error in the figure, or prompt theformatting of the disk is normal, remove the EMMC module can be.
Note that there are stepsbelow.

2.Re-update the repair package for the corresponding model.:
(1)Reinstall the EMMC module on the Neptune4/4Pro machine's motherboard.
(2)Follow the firmware update instructions to update the firmware package for the correspondingmodel.
NOTE:


If using Raspberry Pi lmager on Windows 10 with controlled folder access enabled, you willneed to explicitly allow Raspberry Pi lmager permission to write the SD card. lf this is not donethe imaging process will fail with a "failed to write" error