Kate.G - May 08 2024
How to Connect Anet A8 to Computer

image credit to Youtuber @RCLifeOn
Connecting a 3D printer to a PC, which is also named as online 3D printing, becomes quite popular because of its obvious advantages comparing to printing directly on a 3D printer which has limited access to detailed 3D print settings. Printing through PC could be separate into two sections, 3D printer on-line print driver installation and on-line printing settings. Today, we'll list detailed steps of on-line printing on Anet A8 3D printer.
What Are the Benefits of 3D Printing Through PC?
From a connected PC, we can see errors, make settings and send commands to a 3D printer. And we'd able to log into a LAN website and monitor your computer in real time from another location via webcam. Today, we’ll step by step connect the Anet A8 3D printer to a PC via USB.
How to Connect Anet A8 to Your Computer?
I – Install On-line 3D Printing CH340 Driver on Computer
1. The CH340 on-line printing driver could be found on the SD card on the Anet A8.
SD card: .\A8\A8资料\Software\CH340G Drive
If you lost the A8 SD card, you could download the driver on the following site:Download driver file for your Mac or Windows PC from below links:
Driver for Mac: http://www.wch-ic.com/downloads/CH341SER_MAC_ZIP.html
Driver for windows PC: http://www.wch-ic.com/downloads/CH341SER_EXE.html
2. Unzip the downloaded file and click on the “pkg” format file. Click on “Install” and follow the wizard to complete driver installation. For a windows PC, the procedures can be clicking on the downloaded file and then clicking on “Open”, and following the wizard to proceed.
3. When installation completes, click on “Restart” to restart your PC.
II – Connect A8 3D Printer to the PC
1.Connect the PC to your A8 3D printer with the USB cable in the package of your Anet A8.
2.Power on the printer.
3.Click the “Computer” icon on the desktop of your PC and then select “Device Manager” and then “Ports” to check if CH340 port is already there; if not, you could try to re-install the driver.
After the pc printing driver, CH340 well installed, we then need a software to talk to the computer at a bit transfer rate the printer understands. Cura , Repetierhost and Mattercontroll just to name a few.. We introduce two most commonly used software, Repetier and Cura.
III – Do on-line 3D printing with Repetier
1.Download right version of Repetier-Host for your PC from repetier.com.
2.Install Repetier to your PC.
3.Click on the installed Repetier and select “config” and then “Printer Settings”.
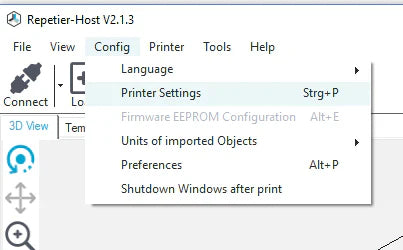
4. Select the right port and baud rate for your A8 3D printer.

Port: which port connects your printer
Baud Rate: how fast Repetier talks to the printer.
The correct baud rate of 115200 for Anet A8. It won't communicate through the COM port unless you do the value right.
Note: if baud rate is incorrect, you’ll see unreadable characters; reduce baud rate until we can read.
5.Set right values for your A8 3D printer.

6.Select Gcode files to do online printing with Repetier.
IV- Do on-line 3D printing with Cura
Get customer attention by clean visual and video
Install Cura to your PC and click on “Monitor”on the top.

2. We can see Anet A8 3D printer is already connected to Cura. Under the "MONITOR" pannel you can remotely control the extruder temperature, build plate temperature, extruder position on XYZ, and send G-code commands.

3. Click on control button and preheat settings to check if the printer is correctly connected.
4. Click on “Prepare”to upload your print file, or just drag the print file in the Cura. Then you could have print settings here, which may vary for different filaments and different models. After all settings, click slice stl file and then directly select “Print via USB”to print.
Recommend reading: PETG Filament Print Settings

5. Back to the Cura "MONITOR" pannel, you can check the temp changes and print finishing percentage.
That’s all the steps to install online 3D printing drivers into a Mac or Windows PC and make 3D prints with Anet A8 3D printer on Repetier or Cura. Have a try and surely you’ll enjoy the convenience of 3D printing through computer.
