


H2D / H2C Filament Buffer - H2 Series for Bambu Lab
Couldn't load pickup availability
Use this text to encourage communication or promote sharing on social networks.
Filament Buffer for Bambu H2D / H2C Buffer Kit for Bambu Lab H2 Series 3D Printer Parts
[Stable Filament Feeding] Optimizes filament tension to prevent tangling and breakage, ensuring smooth consistent supply for uninterrupted 3D printing.
[Series Specific Compatibility] Designed for specified 3D printer series, enabling direct buffer kit replacement to restore optimal extrusion performance.
[Complete Buffer Kit] All essential components included for hassle free installation, eliminating the need for additional parts or tools.
[Durable Resilient Build] Sturdy materials withstand regular filament friction and printer operation, maintaining functionality over extended use.
[Extrusion Stability Enhancement] Reduces filament slack and pressure fluctuations, supporting precise extrusion and sharp print details across projects.
Installation
Learn more about the Filament Buffer Bambu Lab Wiki
Learn more about the Filament Buffer Replace H2S Filament Buffer and Cable | Bambu Lab Wiki
In the Box
For H2D
- Filament Buffer*1
- BT3-8 Screw*4
For H2S
- Filament Buffer*1
- BT3-8 Screw*4
Compatibility
H2D and H2D Laser
H2S and H2S Laser
Replace H2D Filament Buffer and Cable
Filament Buffer
The filament buffer is installed in the printer’s top cover and consists of two sliders, two springs, and a buffer connection board.
The spare parts for the filament buffer include the following:
Filament buffer * 1
BT3x8 screw * 4
When to Use
The AMS is malfunctioning, and upon inspection, the filament buffer is visibly damaged.
Safety Warning
IMPORTANT!
It's crucial to power off the printer before conducting any maintenance work, including work on the printer's electronics and tool head wires. Performing tasks with the printer on can result in a short circuit, leading to electronic damage and safety hazards.
During maintenance or troubleshooting, you may need to disassemble parts, including the hotend. This exposes wires and electrical components that could short circuit if they contact each other, other metal, or electronic components while the printer is still on. This can result in damage to the printer's electronics and additional issues.
Therefore, it's crucial to turn off the printer and disconnect it from the power source before conducting any maintenance. This prevents short circuits or damage to the printer's electronics, ensuring safe and effective maintenance.
Remove the Filament Buffer
Step 1: Remove the AP board cover
Use an H2.0 Allen key to loosen 1 fixing screw (BT2.6x8), and then remove the AP board cover from the side near the front door.
Step 2: Disconnect the 6-pin cable
If the printer is connected to AMS, you will need to disconnect the 6-pin cable.

Step 3: Disconnect the PTFE tube
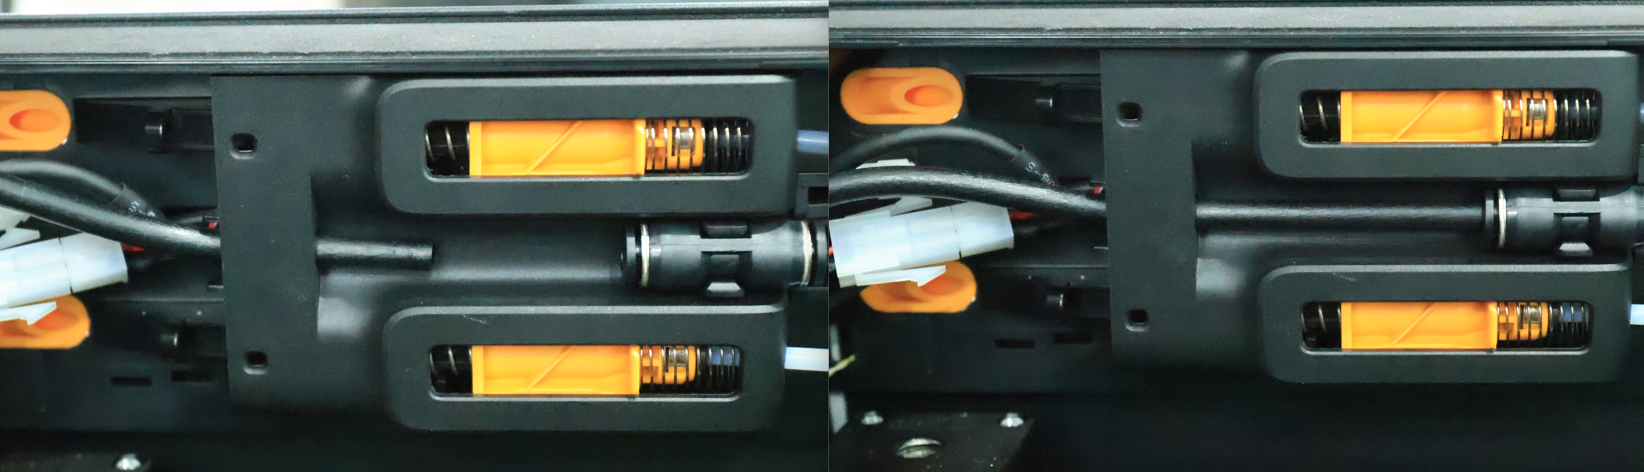
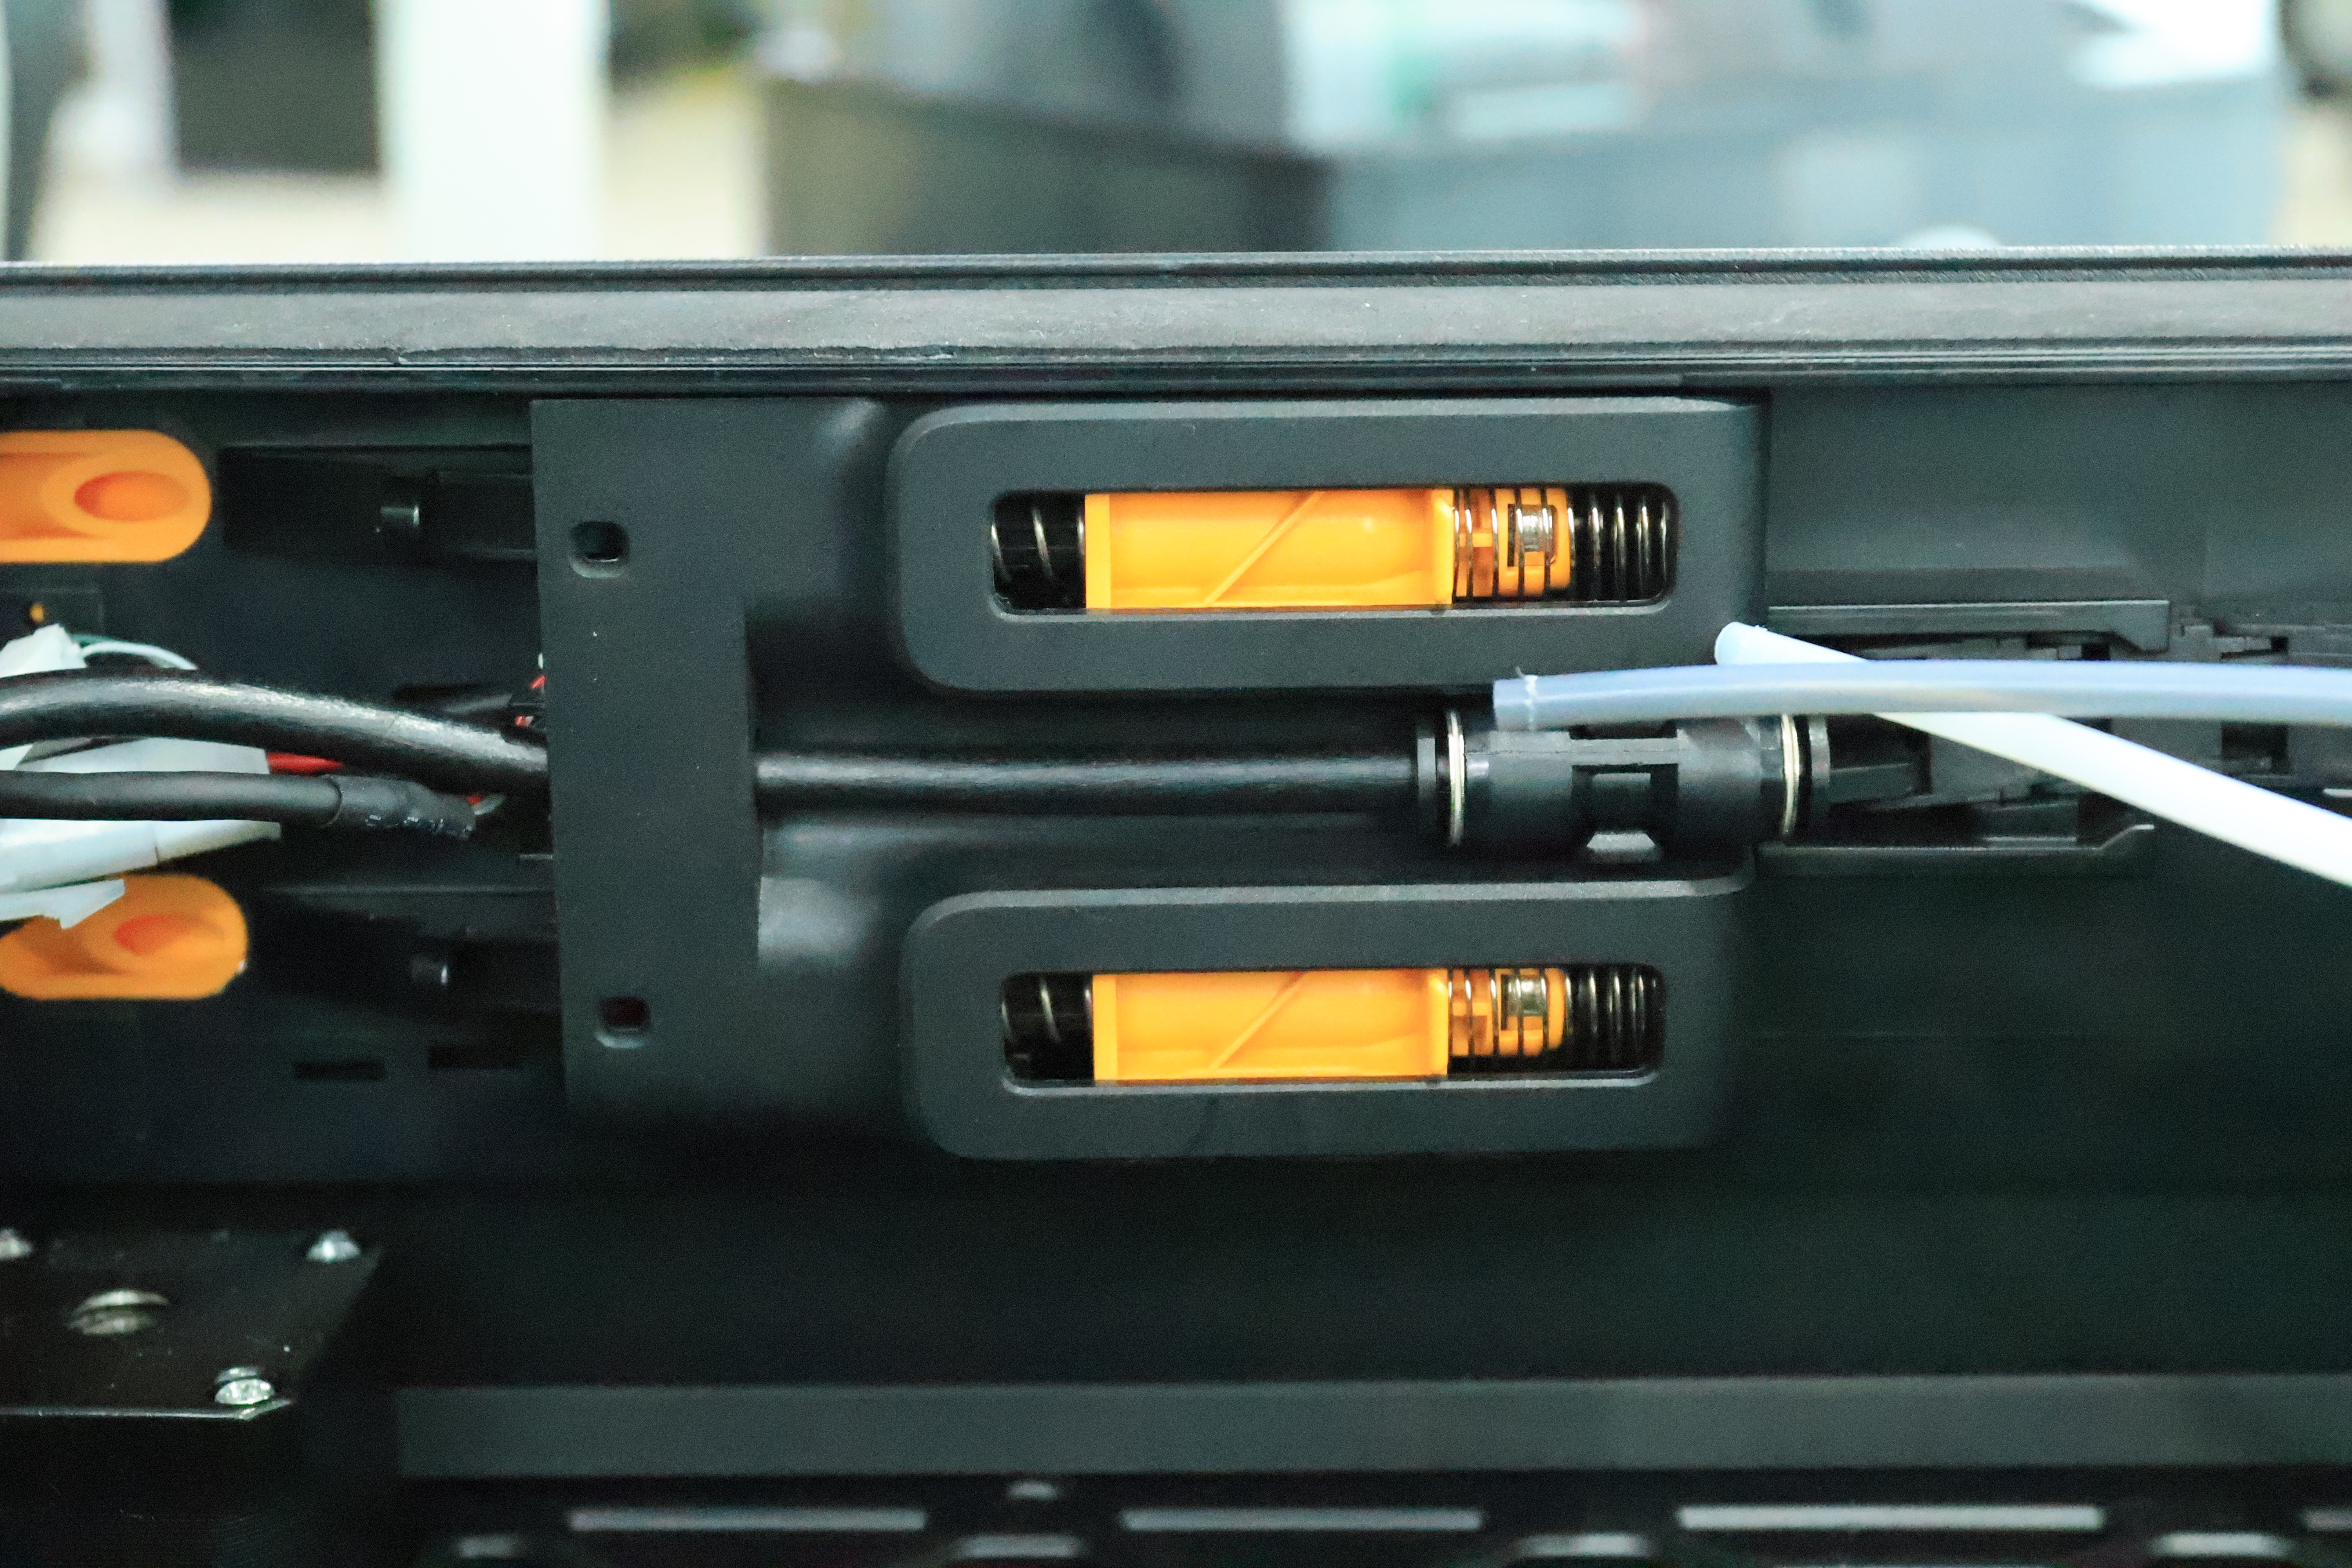
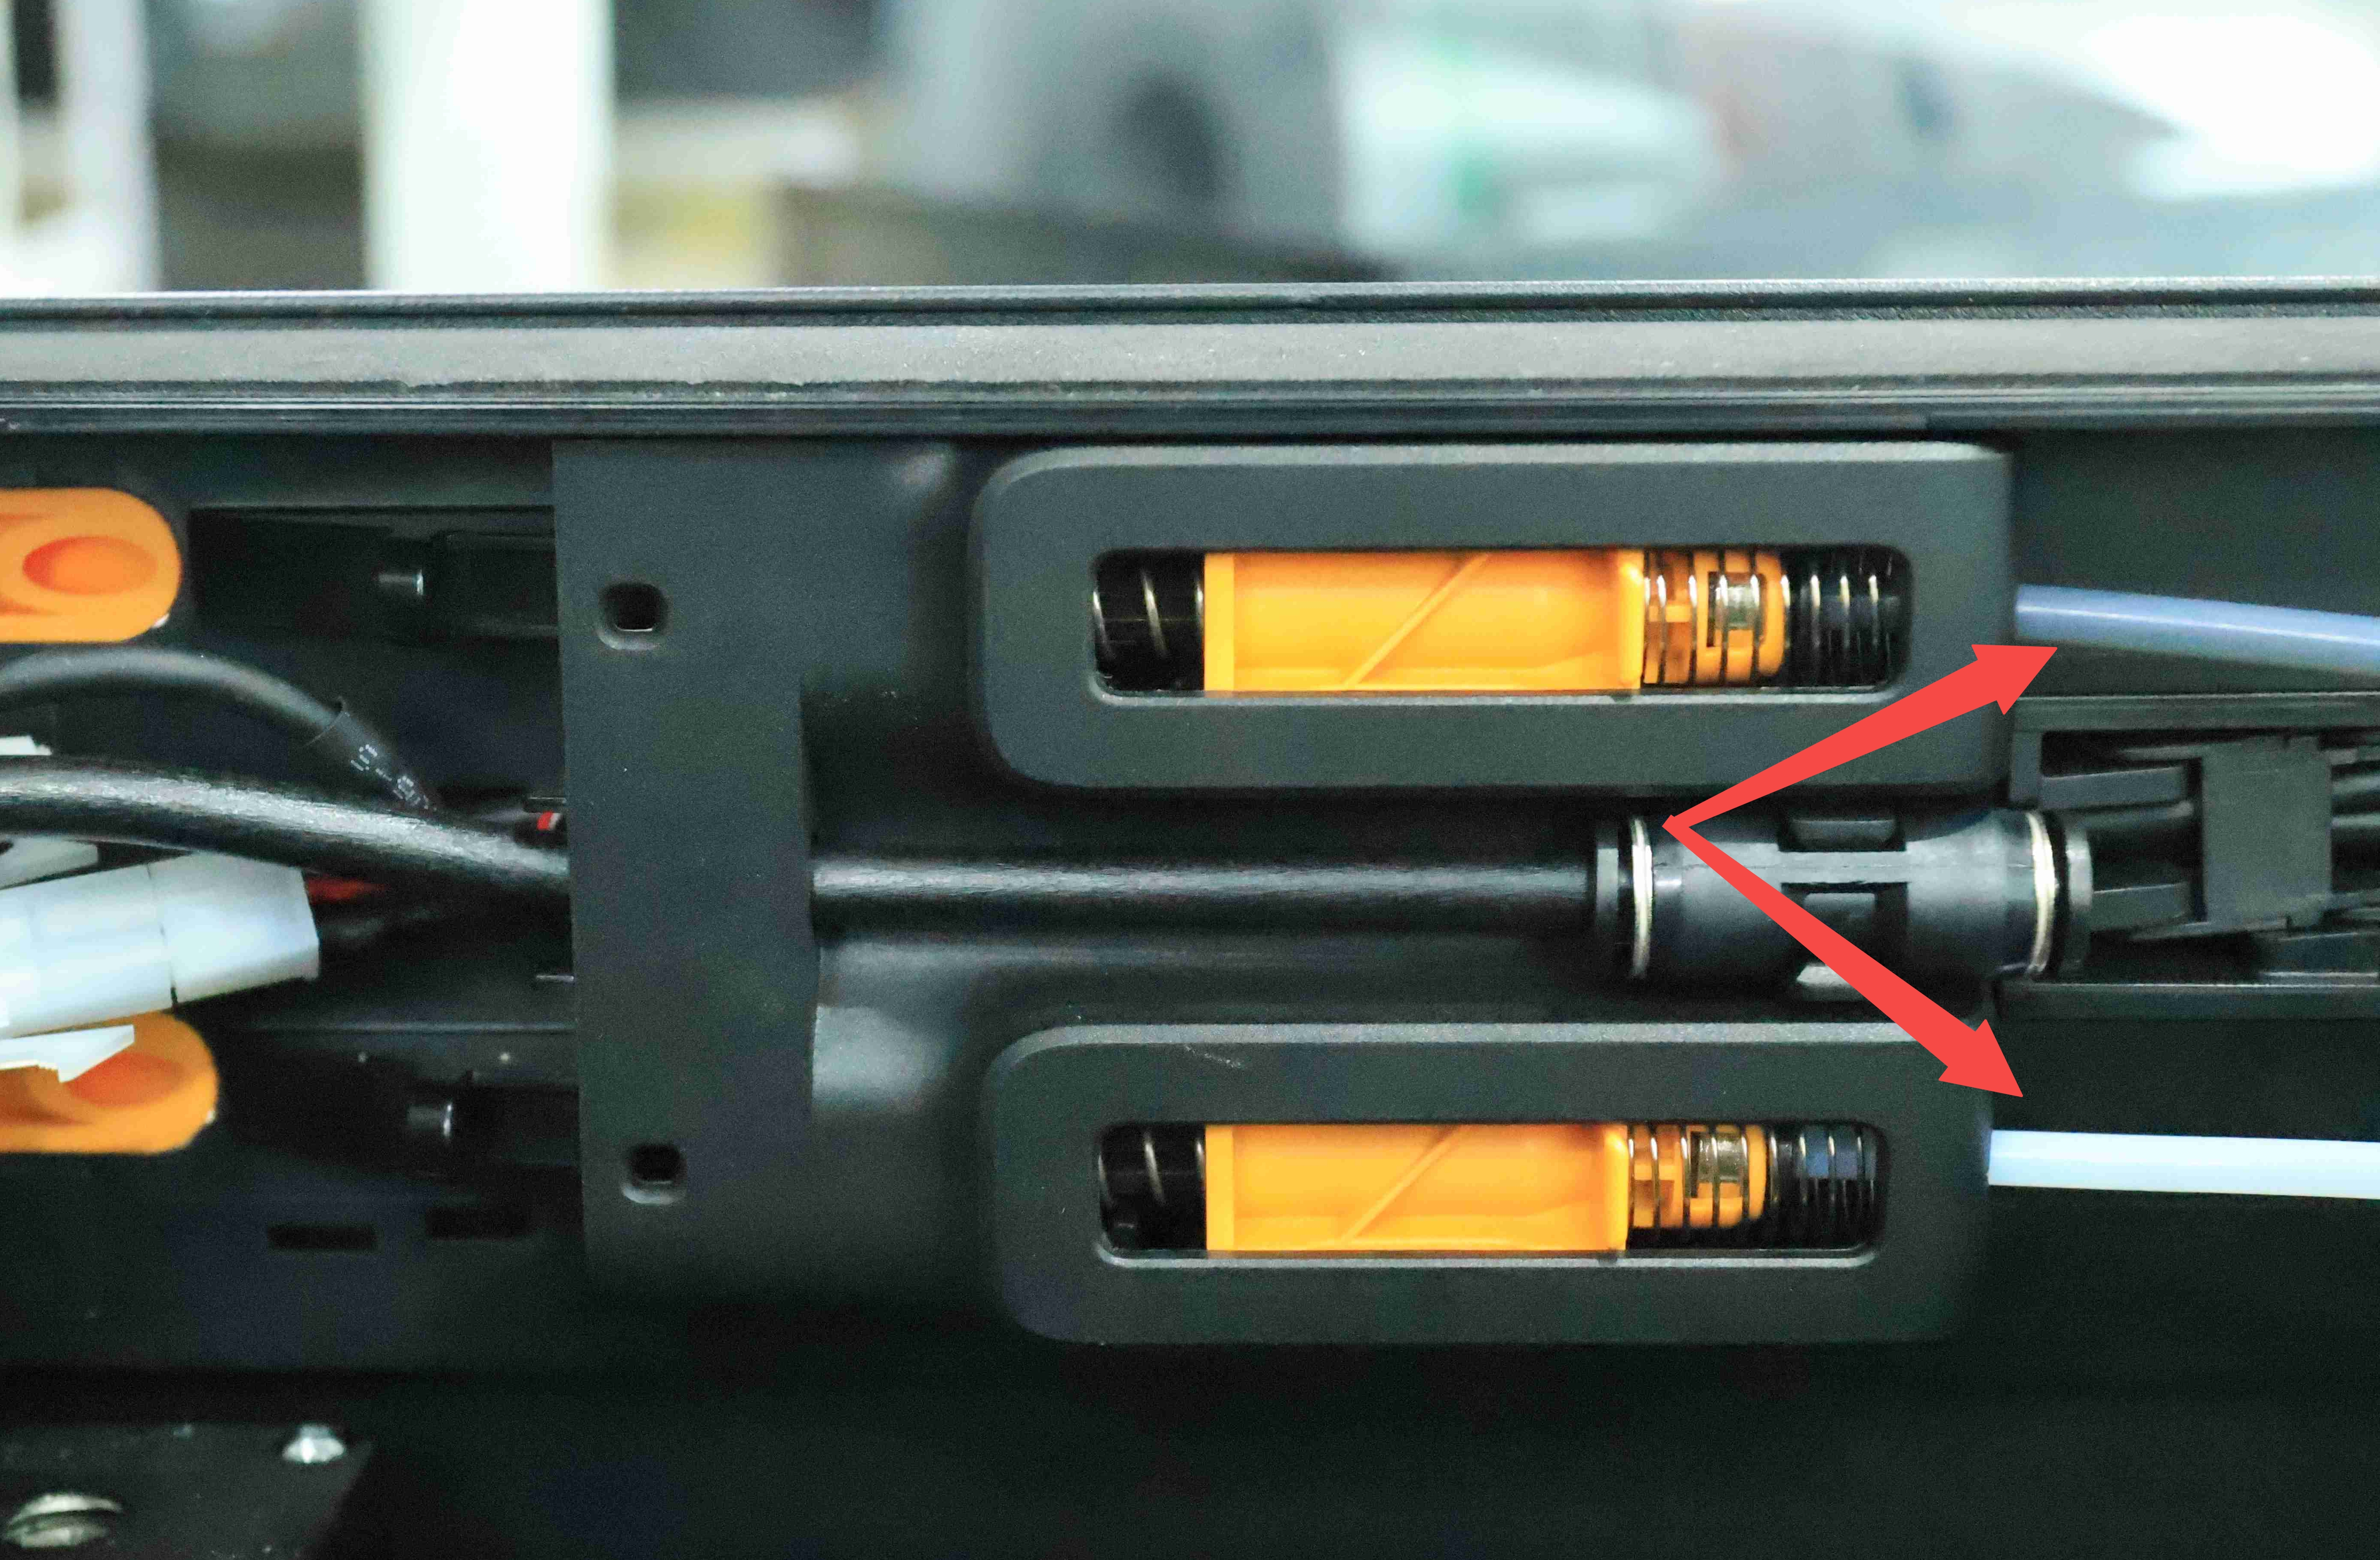
1. Press the pneumatic connector on the back of the printer to disconnect the two PTFE tubes from the filament buffer.

2. Push the buffer slider to the far right, then press the pneumatic connector and disconnect the two PTFE tubes connected to the toolhead one by one.
 Note: If it is an H2DL printer, you also need to disconnect the tube. Press the pneumatic connector of the built-in air pump to pull out the tube.

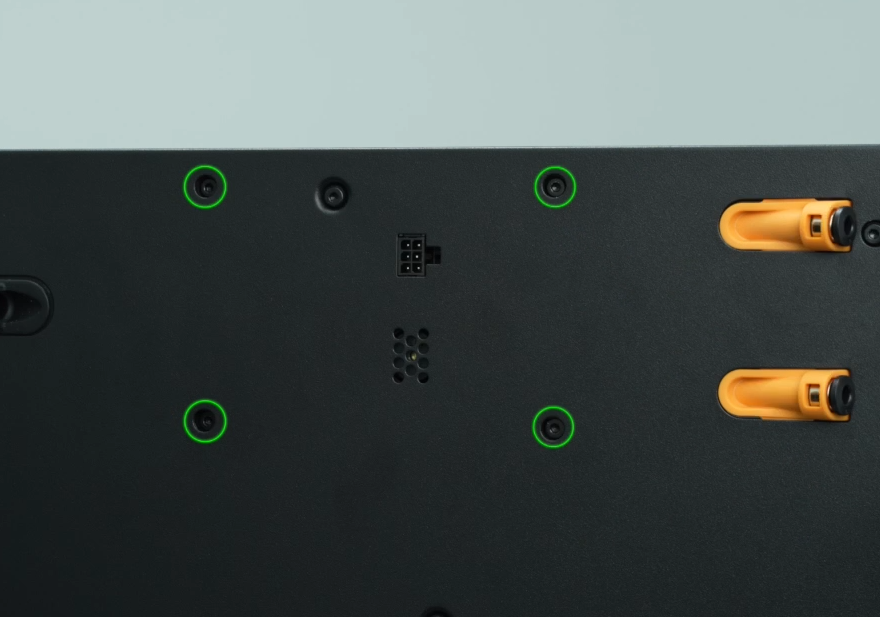
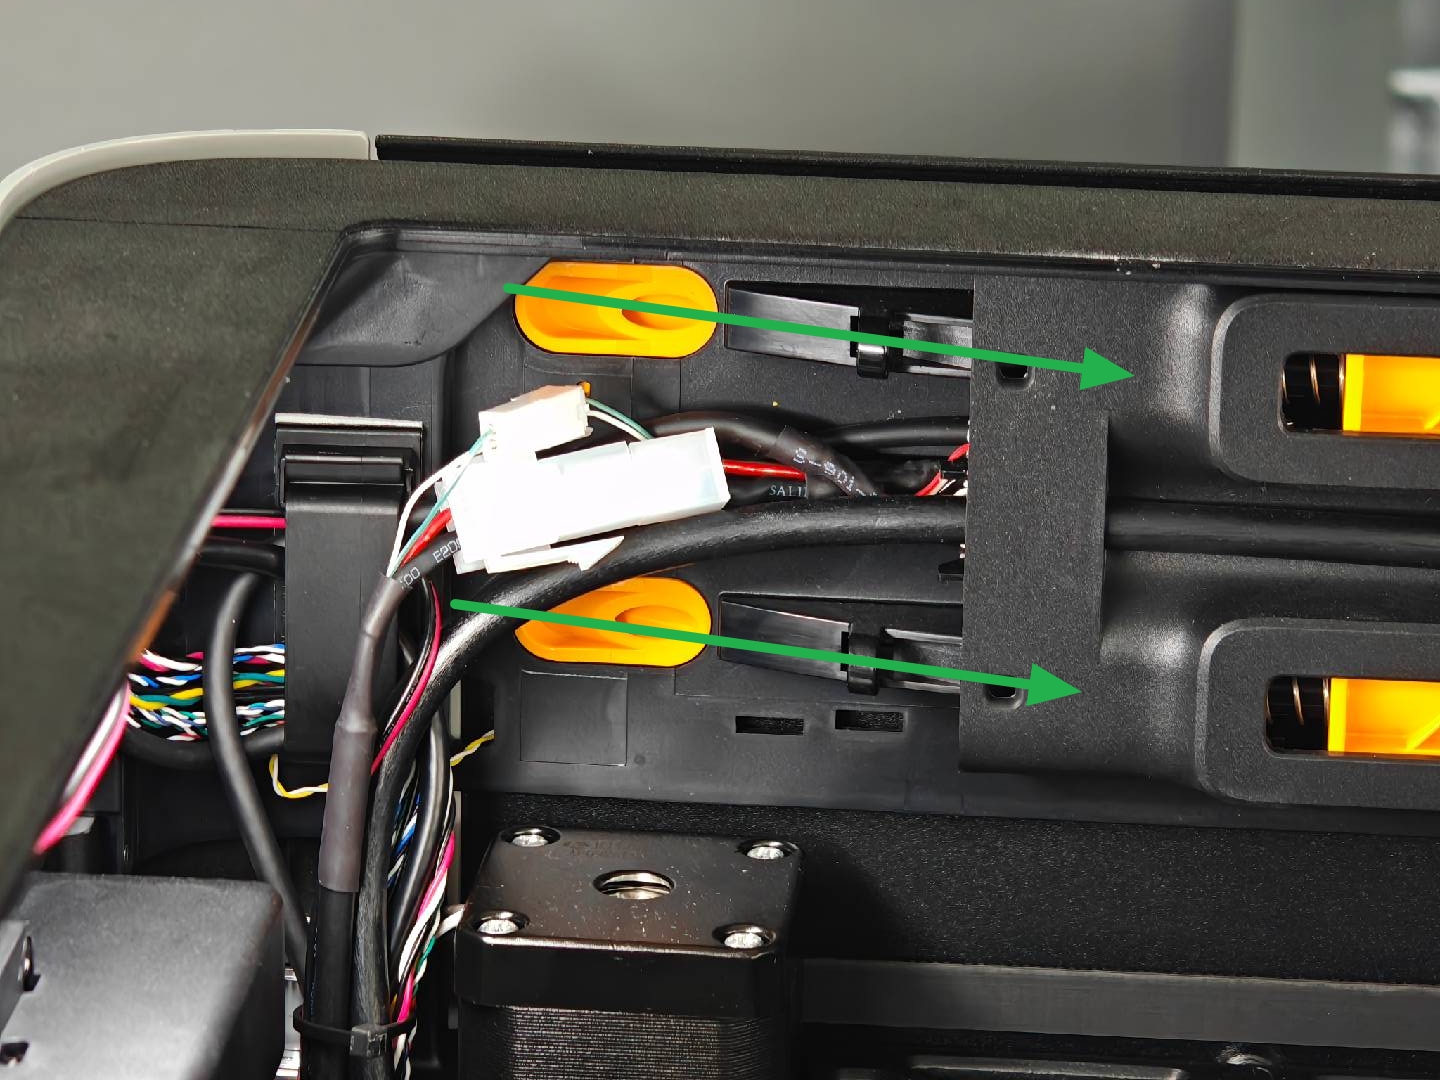
Step 4: Remove the filament buffer screws
Use an H2.0 Allen key to remove the 4 fixing screws (BT3x8) securing the filament buffer.
Note: When removing the fixing screws, hold the buffer with your hand to prevent it from falling.
 Step 5: Disconnect the filament buffer cable
Use an Allen key to pry the side of the cable; Disconnect the cable by carefully prying out the connector.
 Install the filament buffer
Step 1: Connect the cable and secure the buffer
Reconnect the buffer cable to the filament buffer;
Note:
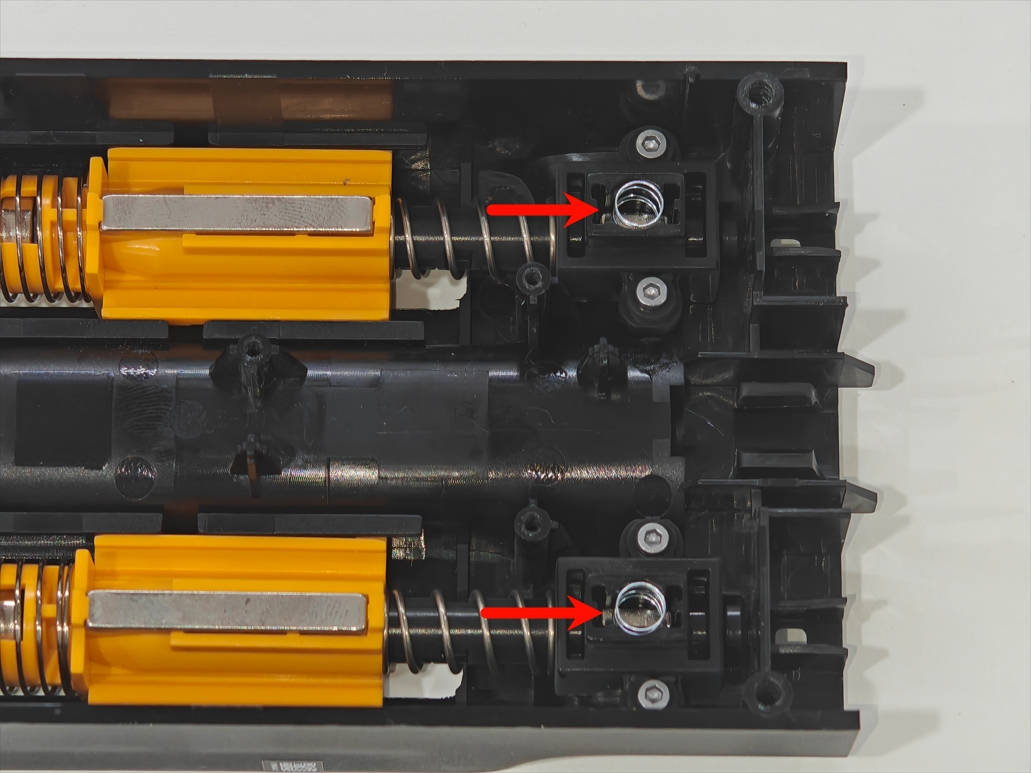
During this step, it is possible that the magnets may fall out. If your magnets and springs come loose during installation, please refer to the image below for the correct reinstallation method.
Please use a H1.5 hex key to remove the three screws marked in red in the image below, and then take out the buffer. Please pay close attention to the installation direction of the red trapezoidal magnet shown in the image below. We also recommend using a H2.0 hex key to assist with the installation. Please refer to the image for the correct installation method.
 The image below shows the correct installation result.
Finally, please reinstall the three screws that you removed earlier.
If it is H2DL, the tube must also be connected;
 Put the filament buffer back in place.
 Step 2: Secure the filament buffer
Use an H2.0 Allen key to tighten the 4 fixing screws (BT3x8).
 Step 3: Connect the PTFE
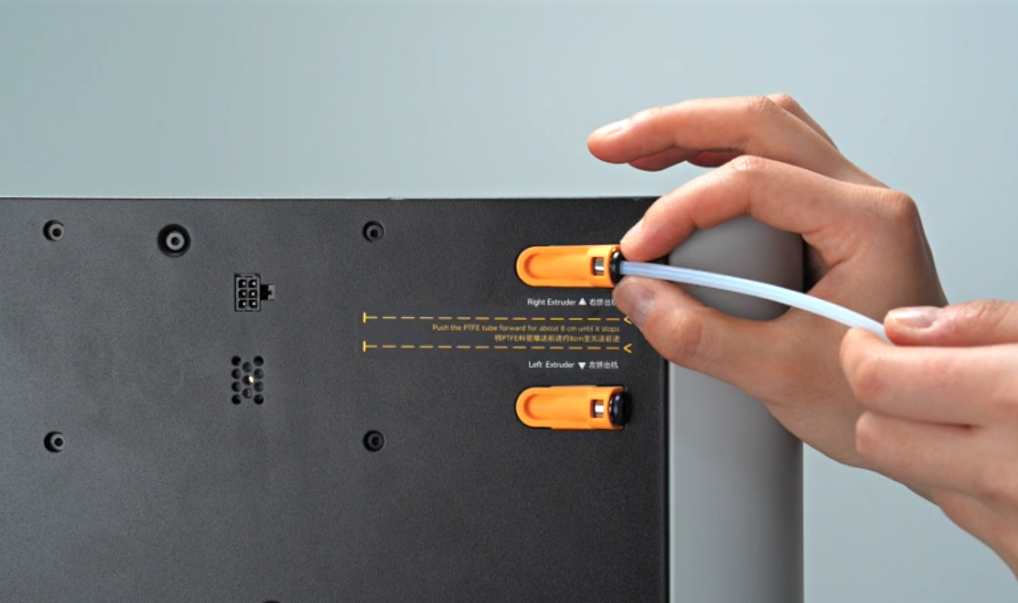
Reconnect the two PTFE tubes from the toolhead to the filament buffer one by one;
reconnect the PTFE tubes on the back of the printer to the filament buffer.
Step 4: Reinstall the AP board cover
Note: Before installing the AP board cover, it is necessary to check whether the cables are obstructing the PTFE piping. Avoiding such obstruction will prevent any interference with the subsequent installation of the PTFE piping.
First, snap the AP board cover back from the side close to the back of the printer, press the two places indicated by the arrows into place, flush with the buffer on the right side and flush with the cable cover on the bottom, and then tighten a fixing screw (BT2.6x8) using an H2.0 Allen key.

Remove the filament buffer cable
Step 1:Remove AP board cover and cable cover
1.Use an H2.0 Allen key to unscrew one set screw (BT2.6x8), then remove the AP board cover from the side near the front door.

2.The cable cover is fixed by the buckle, you can pull out the cable cover; In this case, disconnect the buffer cable.

Step 2:Remove the rear panel
You can refer to this Wiki to remove the H2D rear panel:
Step 3:Remove the purge chute
Use an H2.0 Allen key to remove one set screw (BT3x8), then pull the purge chute downward until the two latches of the purge chute are visible, then pull the purge chute outwards.
In addition to the screws on the top of the purge chute, there are also two buckles on the bottom lining for fixing.

Step 4:Remove the filament buffer cable
Disconnect the Buffer cable from the MC board, then disconnect the Buffer cable from the buffer, and pull the cable out of the left inner lining.
 Install the filament buffer cable
Step 1:Connect the filament buffer cable
Insert the new cable connector into the buffer and follow this path through the cable hole in the inner lining;
 Then connect the other end of the buffer cable to the MC board.

Step 2:Install the Purge Chute
Align the two buckles at the bottom of the purge chute with the two holes on the inner lining;
 Then fasten the purge chute upward, make sure that the buckle at the bottom is in the inner lining, hold the top of the purge chute with your hand, align the screw holes on the top of the purge chute, and finally tighten a fixed screw using an H2.0 Allen key, and tie the yellow-green and red-white cables behind the wire fasteners on the top of the purge chute.
 Note: When installing the purge chute, it is necessary to pay attention to buckling the two sides of the purge chute to the outside of the lining. If the buckle on the inside may not be installed normally.

Step 3:Install the AP board and cable cover
Snap the cable cover into the printer;
 Snap back the AP board cover from the side near the back of the printer, press both of the arrows in place, right side flush with the buffer, bottom flush with the cable cover, then use an H 2.0 Allen key to tighten a set screw (BT2.6x8).

Step 4:Install the rear panel
You can refer to this Wiki to install the H2D rear panel:
Verify the Functionality
Power on the printer and initiate a print using the AMS to check if it prints normally. If the print completes successfully, the replacement is successful.
If unsuccessful, check if the buffer cable and PTFE tubes are correctly connected and try again.
If the issue persists, contact Bambu Lab technical support for further assistance.
Tools and Materials Needed
New filament buffer
H2.0 Allen key
Specifications and quantities of screws involved in replacing the H2D filament buffer (it is recommended to keep the removed screws properly to avoid loss):