


Cable Chain - H2 Series for Bambu Lab
Couldn't load pickup availability
Use this text to encourage communication or promote sharing on social networks.
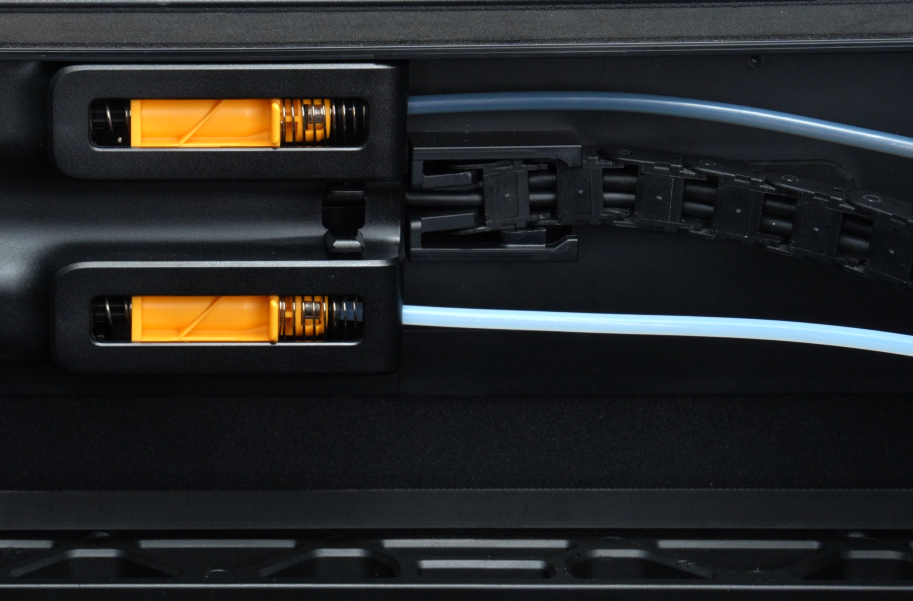
The Cable Chain assembly links the toolhead to the printer's rear, housing the PTFE tube, USB-C cable, and Toolhead-to-MC Board cable/power cable.
Installation
Learn more about H2D and H2C Cable Chain on Bambu Lab Wiki.
Learn more about H2S Cable Chain on Bambu Lab Wiki.
In the Box
For H2D and H2C
- Cable Chain*1
- Cable Chain Base*1
- Cable Chain Clip*2
For H2S
- Cable Chain*1
- Cable Chain Base*1
- Cable Chain Base Clip*1
- Cable Chain Clip*2
Compatibility
H2D and H2D Laser
H2S and H2S Laser
H2C and H2C Laser
Replace H2D Cable Chain
This article describes how to replace H2D Cable Chain
Cable Chain
The cable chain is used to connect the toolhead to the rear side of the printer. The PTFE tube, USB-C cable, and MC-TH communication/power cable are all installed within the cable chain.
The cable chain includes the following:
Cable chain (pre-installed with two clips) * 1
Cable chain bracket/base * 1
When to use
The cable chain is broken.
The cable chain base is damaged and cannot be secured.
Tools and materials needed
New cable chain
The replacement process for the cable chain does not involve any screws.
Safety Warning
IMPORTANT!
It's crucial to power off the printer before conducting any maintenance work, including work on the printer's electronics and tool head wires. Performing tasks with the printer on can result in a short circuit, leading to electronic damage and safety hazards.
During maintenance or troubleshooting, you may need to disassemble parts, including the hotend. This exposes wires and electrical components that could short circuit if they contact each other, other metal, or electronic components while the printer is still on. This can result in damage to the printer's electronics and additional issues.
Therefore, it's crucial to turn off the printer and disconnect it from the power source before conducting any maintenance. This prevents short circuits or damage to the printer's electronics, ensuring safe and effective maintenance. For any concerns or questions about following this guide, we recommend submitting a technical ticket regarding your issue and we will do our best to respond promptly and provide the assistance you need.
Replace the Cable Chain
Remove the Cable Chain
¶Step 1: Remove the PTFE tube
To facilitate the subsequent removal/installation of the cable chain, you can first disconnect the PTFE tube from the buffer.
Push the buffer slider to the far right, then press the pneumatic connector and disconnect the two PTFE tubes from the buffer.

Step 2: Remove the Clips
Unfasten the clips installed on the cable chain and remove both clips.
After removing the clips, the PTFE tube can remain on the clips. The following images are for demonstration purposes only.

Step 3: Remove the Cable Chain
1.First, disconnect the side of the cable chain connected to the cable chain base, and partially pull out the USB-C cable and MC-TH cable from the cable chain.

2.Remove the tail of the cable chain from the upper cover, then completely remove the USB-C cable and MC-TH cable from the cable chain to fully detach the cable chain.

Install the Cable Chain
Step 1: Install the Cable Chain
1.First, insert the USB-C cable and MC-TH cable into the cable chain (the side near the base can be left uninstalled temporarily), then connect the cable chain to the upper cover.
Note the orientation: the end with round holes connects to the upper cover, and the end with protrusions connects to the cable chain bracket.
2.With the closed side of the cable chain facing outward, insert the first section of the cable chain into the bracket clip, then push the cable chain forward until it is fully secured with the upper frame clip.

3.Insert the remaining USB-C cable and MC-TH cable into the cable chain and connect the cable chain to the base.

Step 2: Install the Cable Chain Clips
Install the two clips on the 8th and 18th sections of the cable chain (counting from the base side). Refer to the images below to reattach the clips to the cable chain.
During clip removal, the PTFE tube remains on the clips. The following images are for demonstration purposes only.

Step 3: Reconnect the PTFE Tube
Reconnect the PTFE tube to the buffer.
Replace the Cable Chain Base Bracket
Remove the Cable Chain Base Bracket
1.Disconnect the cable chain from the base bracket and partially pull out the USB-C data cable and MC-TH cable from the cable chain to facilitate removal of the base.

2.The damaged part of the cable chain base bracket assembly is typically the bracket. In such cases, it is recommended to only replace the bracket. Before replacement, slowly cut off the bracket using pliers.
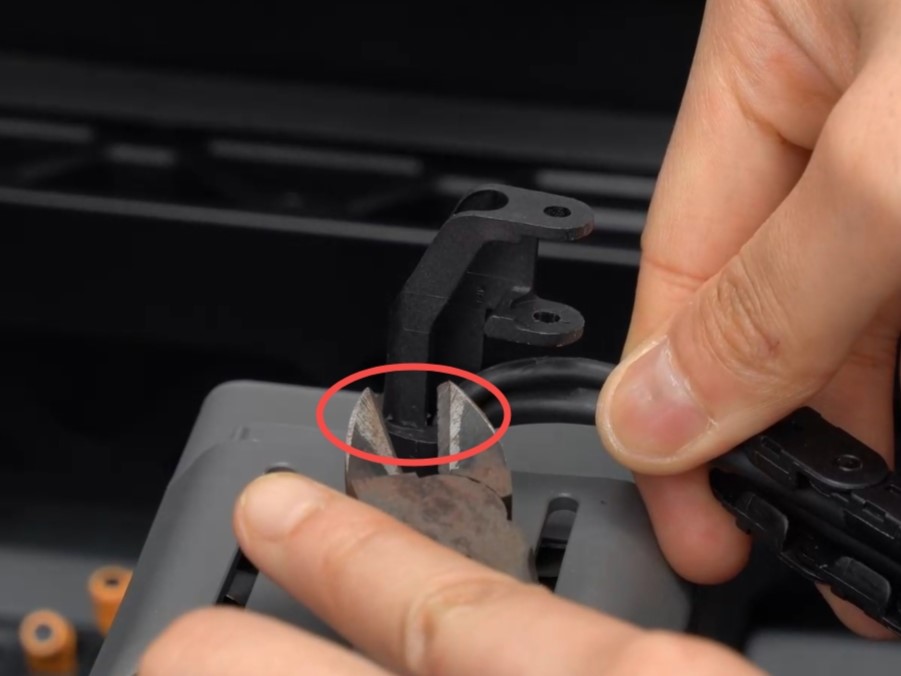
During regular printer use, the cable chain base is not prone to damage and can be challenging to install. Exercise caution to avoid damaging the base during cutting.
As shown below, carefully cut and remove the bracket.

When cutting, it is recommended to ensure that no one else is standing nearby, or use your hand as a shield to prevent flying debris from injuring others.

Install the Cable Chain Base Bracket
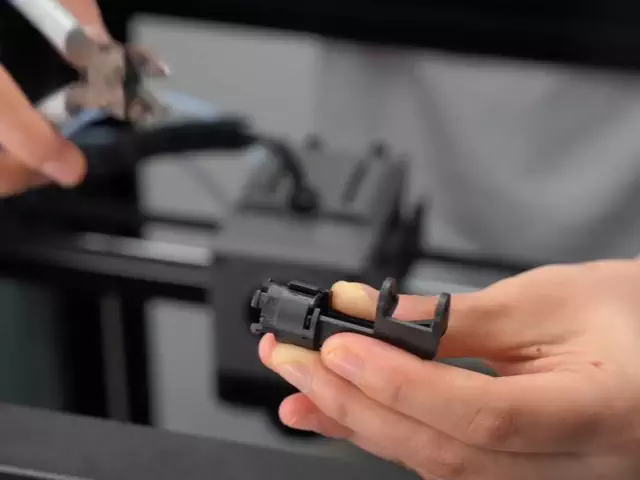
1.Install a new cable chain base bracket.

Due to variations in cable chain base assembly batches, some units have the base and bracket integrated during production. In such cases, use pliers to separate the bracket from the base, retaining the bracket portion, and follow the aforementioned steps for installation.
2.Insert the USB-C cable and MC-TH cable into the cable chain, then connect the cable chain to the base.

Verify the Functionality
Ensure that all cables and PTFE tubes are securely attached and the cable chain is not loose.