Birds Eye /Live View /Nozzle/Toolhead Camera for Bambu Lab
Couldn't load pickup availability
Use this text to encourage communication or promote sharing on social networks.
Nozzle Camera
Easy Installation:Follow the Bambu Lab Wiki for a straightforward installation process, ensuring you're up and running quickly.
Durable Construction:With a 105℃ evaporative material limit, the nozzle camera withstands high temperatures during printing.
Compatibility with Bambu Lab H2D:Designed specifically for Bambu Lab H2D, this nozzle camera seamlessly integrates with your 3D printer.
Fast Frame Rates:Achieve smooth, real-time monitoring with frame rates up to 30fps, ideal for detecting hotend wrapping or air printing issues.
Bambi Lab Nozzle Camera|Bambi Nozzle Camera|High Resolution 1080p:Capture sharp, detailed images with 1080p resolution, ensuring precise monitoring of your 3D printing process.
The Nozzle Camera, mounted at the toolhead's rear, supports 1080p at 10fps (up to 30fps) for detecting hotend wrapping, air printing, spaghetti issues, and Chute positioning.
this camera is a crucial tool for detecting and preventing common 3D printing issues such as hotend wrapping, air printing, spaghetti extrusion, and Chute positioning. With its high-resolution 1080p output, the Nozzle Camera captures clear images at a rate of up to 30 frames per second, ensuring that you can swiftly identify and address any problems that may arise during your print.nn**Reliable Performance in High-Temperature Environments**nThe Bambu Lab H2D Nozzle Camera is engineered to withstand the high temperatures of 3D printing, capable of operating at 105℃ without compromising its performance. This makes it a reliable companion for printing with materials that require higher temperatures, such as ABS or PETG. The camera's terzetto wavelength ensures compatibility with a wide range of 3D printing filaments, further expanding its utility in various printing scenarios.nn**Easy Installation and Seamless Integration**nThe Bambu Lab H2D Nozzle Camera is designed for quick and straightforward installation, with detailed instructions available on the Bambu Lab Wiki. This means that even users new to 3D printing can integrate the camera into their setup with confidence. Once installed, the Nozzle Camera seamlessly integrates with your 3D printer's existing software, providing real-time feedback on the print's progress and allowing for quick adjustments to improve the quality of your prints. With this tool, you can achieve professional-grade results right from the comfort of your home or workshop.
In the Box
-Nozzle Camera*1
- BT2-5 Screw*2
Compatibility
H2D and H2D Laser
H2C and H2C Laser

Toolhead Camera
The toolhead camera (1080p, 30fps), mounted on the right side, enables motion accuracy calibration, precise nozzle offset adjustment, and code recognition for the build plate and laser pad.
In the Box
For H2D/H2C
- Toolhead Camera*1
- M2-5 Screw*2
For H2S
- Toolhead Camera*1
- BT2-8 Screw*2
Compatibility
H2 Series
For H2D/H2C

For H2S

Live View Camera - H2 Series
The live camera is installed inside the printer. through the live camera, you can view the printing process in real time in bambustudio and bambuhandy, and provide a variety of intelligent detection functions such as fried noodle detection, foreign matter detection, printing.plate detection, and hot end type identification.
The Live View Camera provides remote livestreaming, spaghetti detection, and additional features.
In the Box
- Live View Camera*1
- Live View Camera Cable*1
- M3-6 Screw *2
- Privacy Cover*1
Compatibility
H2 Series

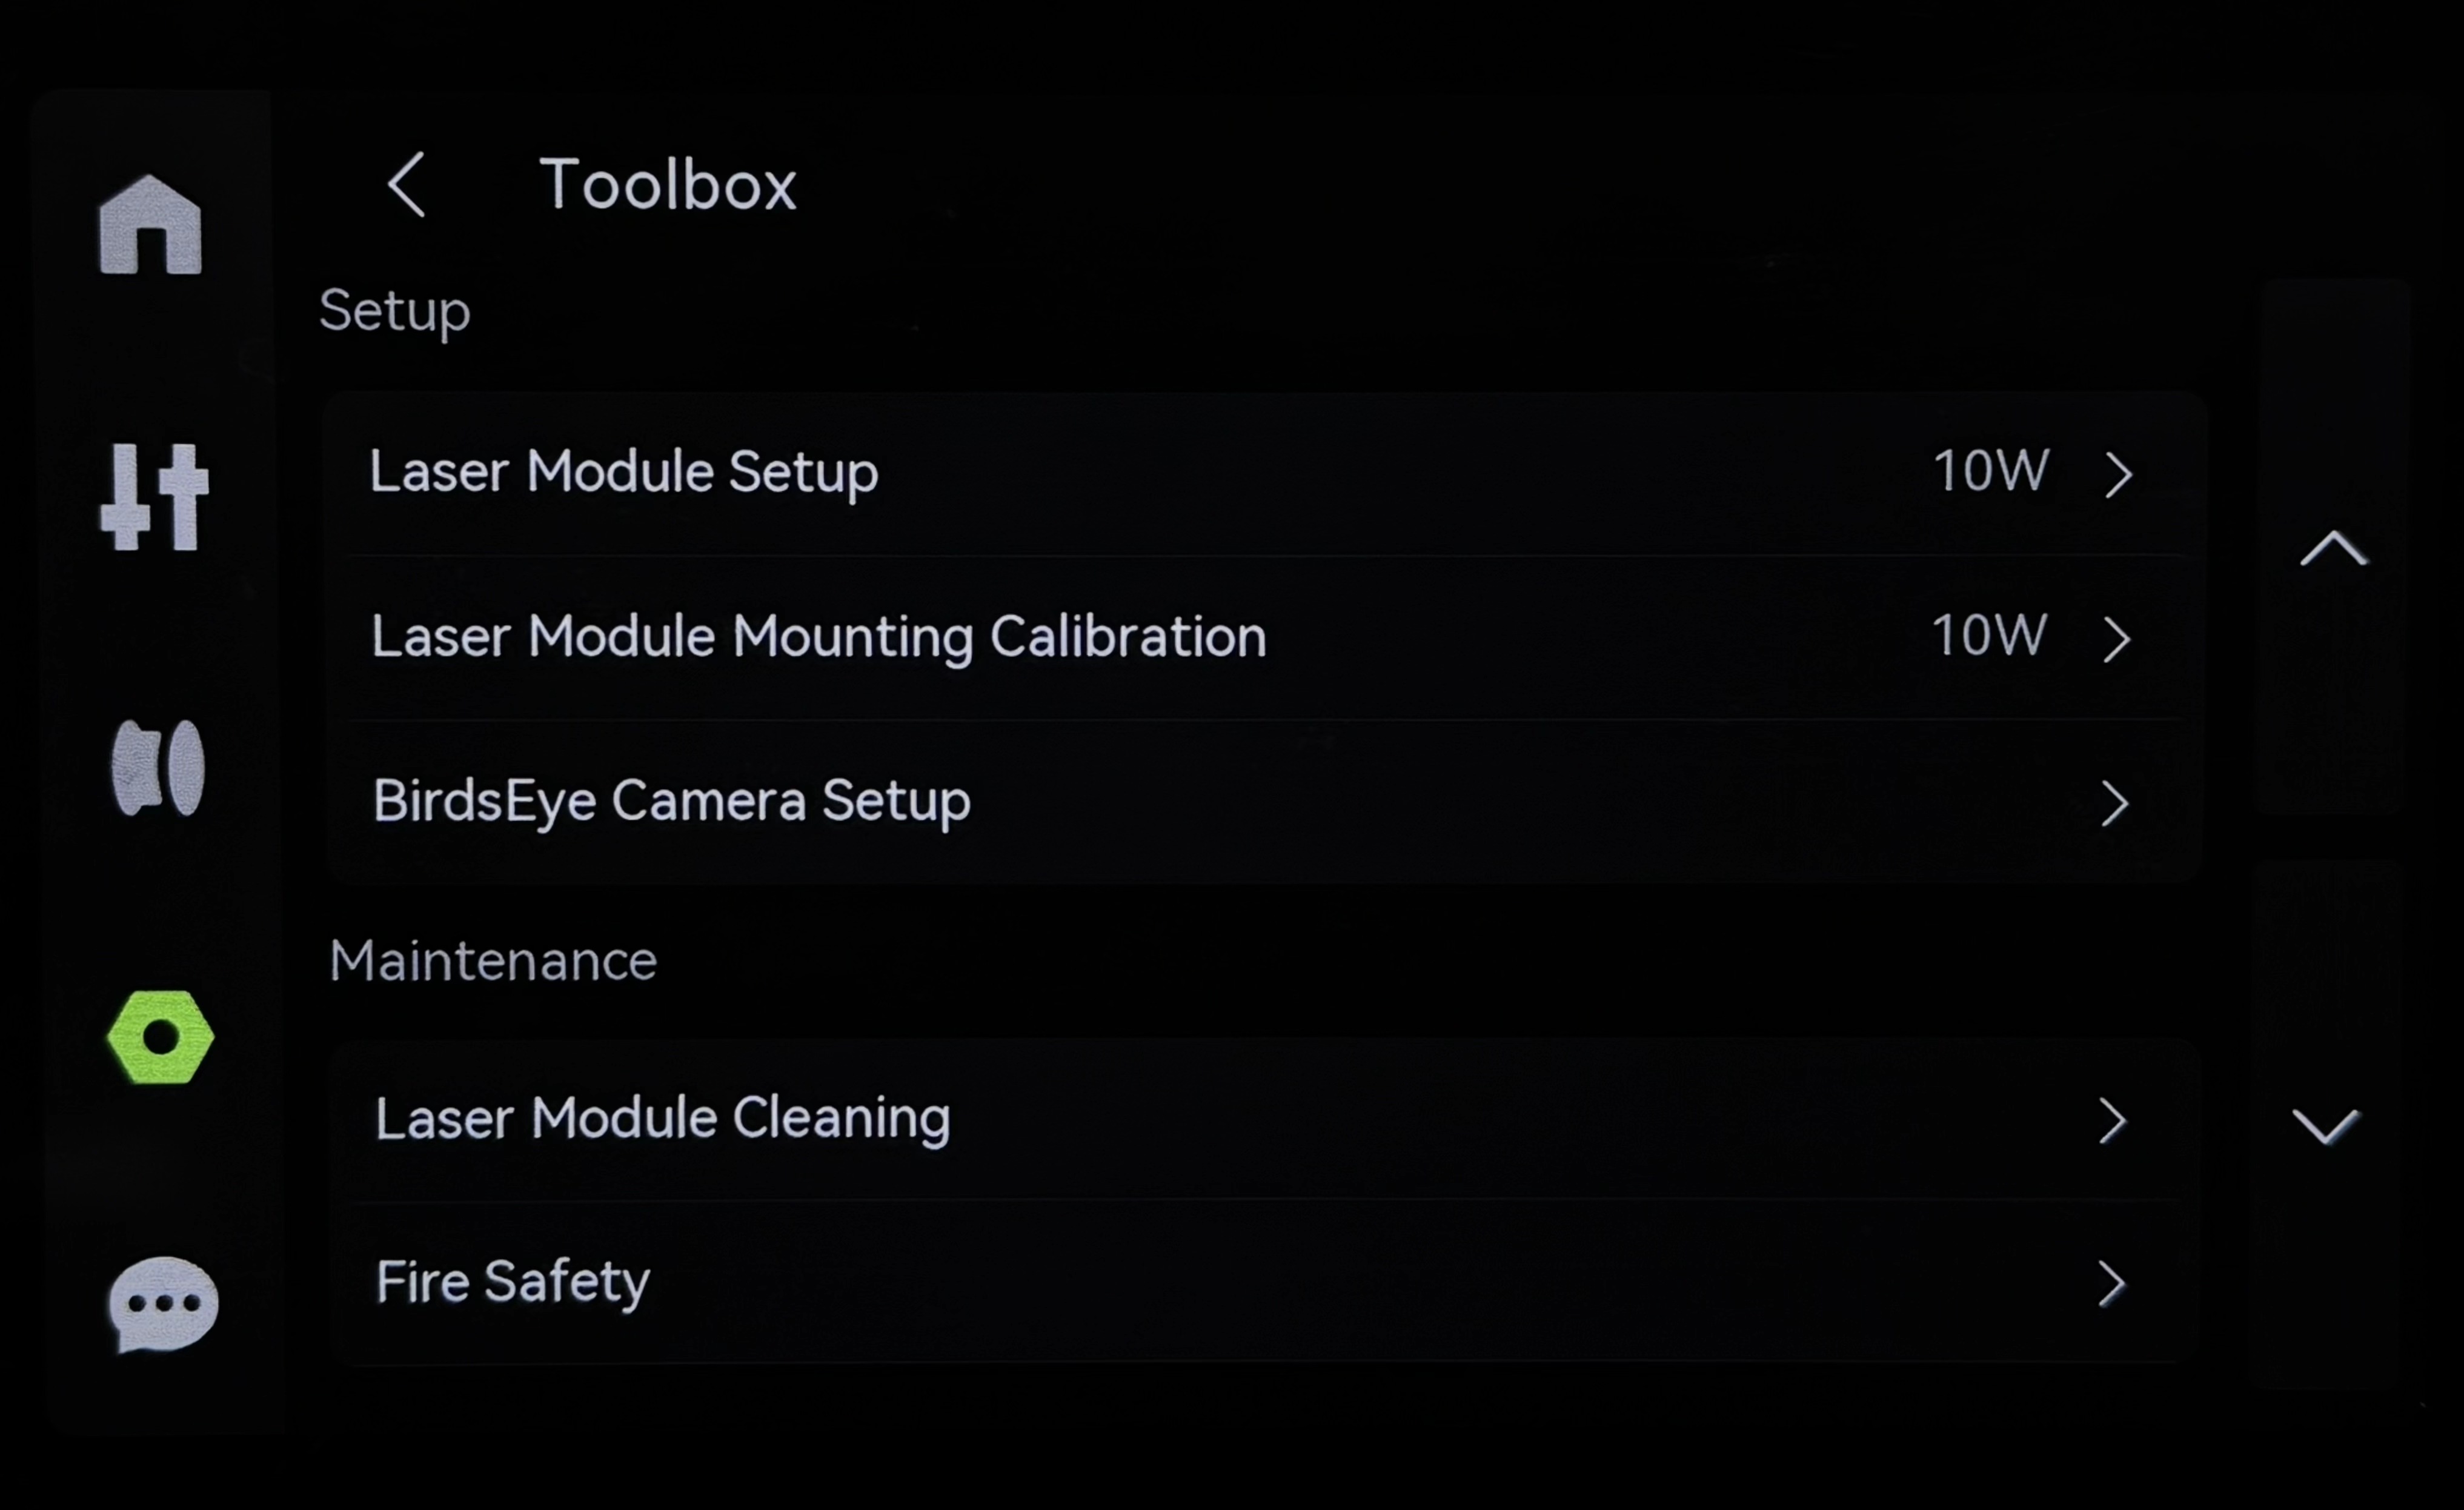
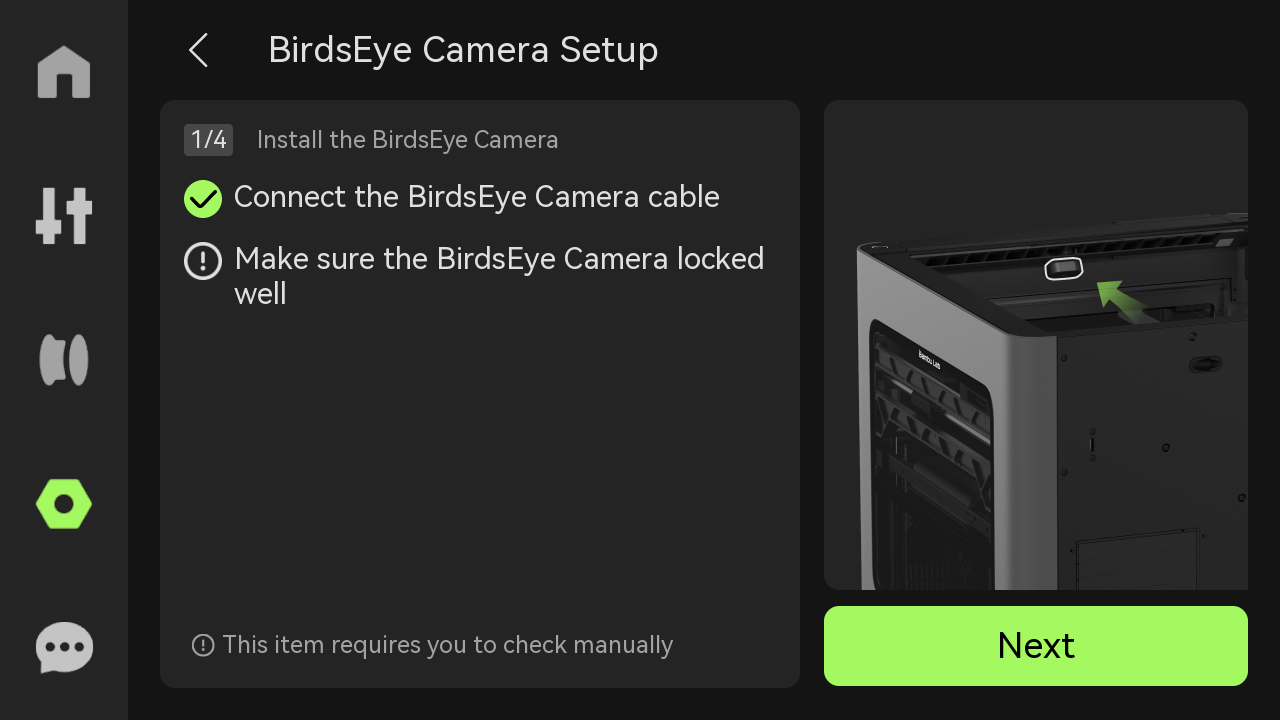
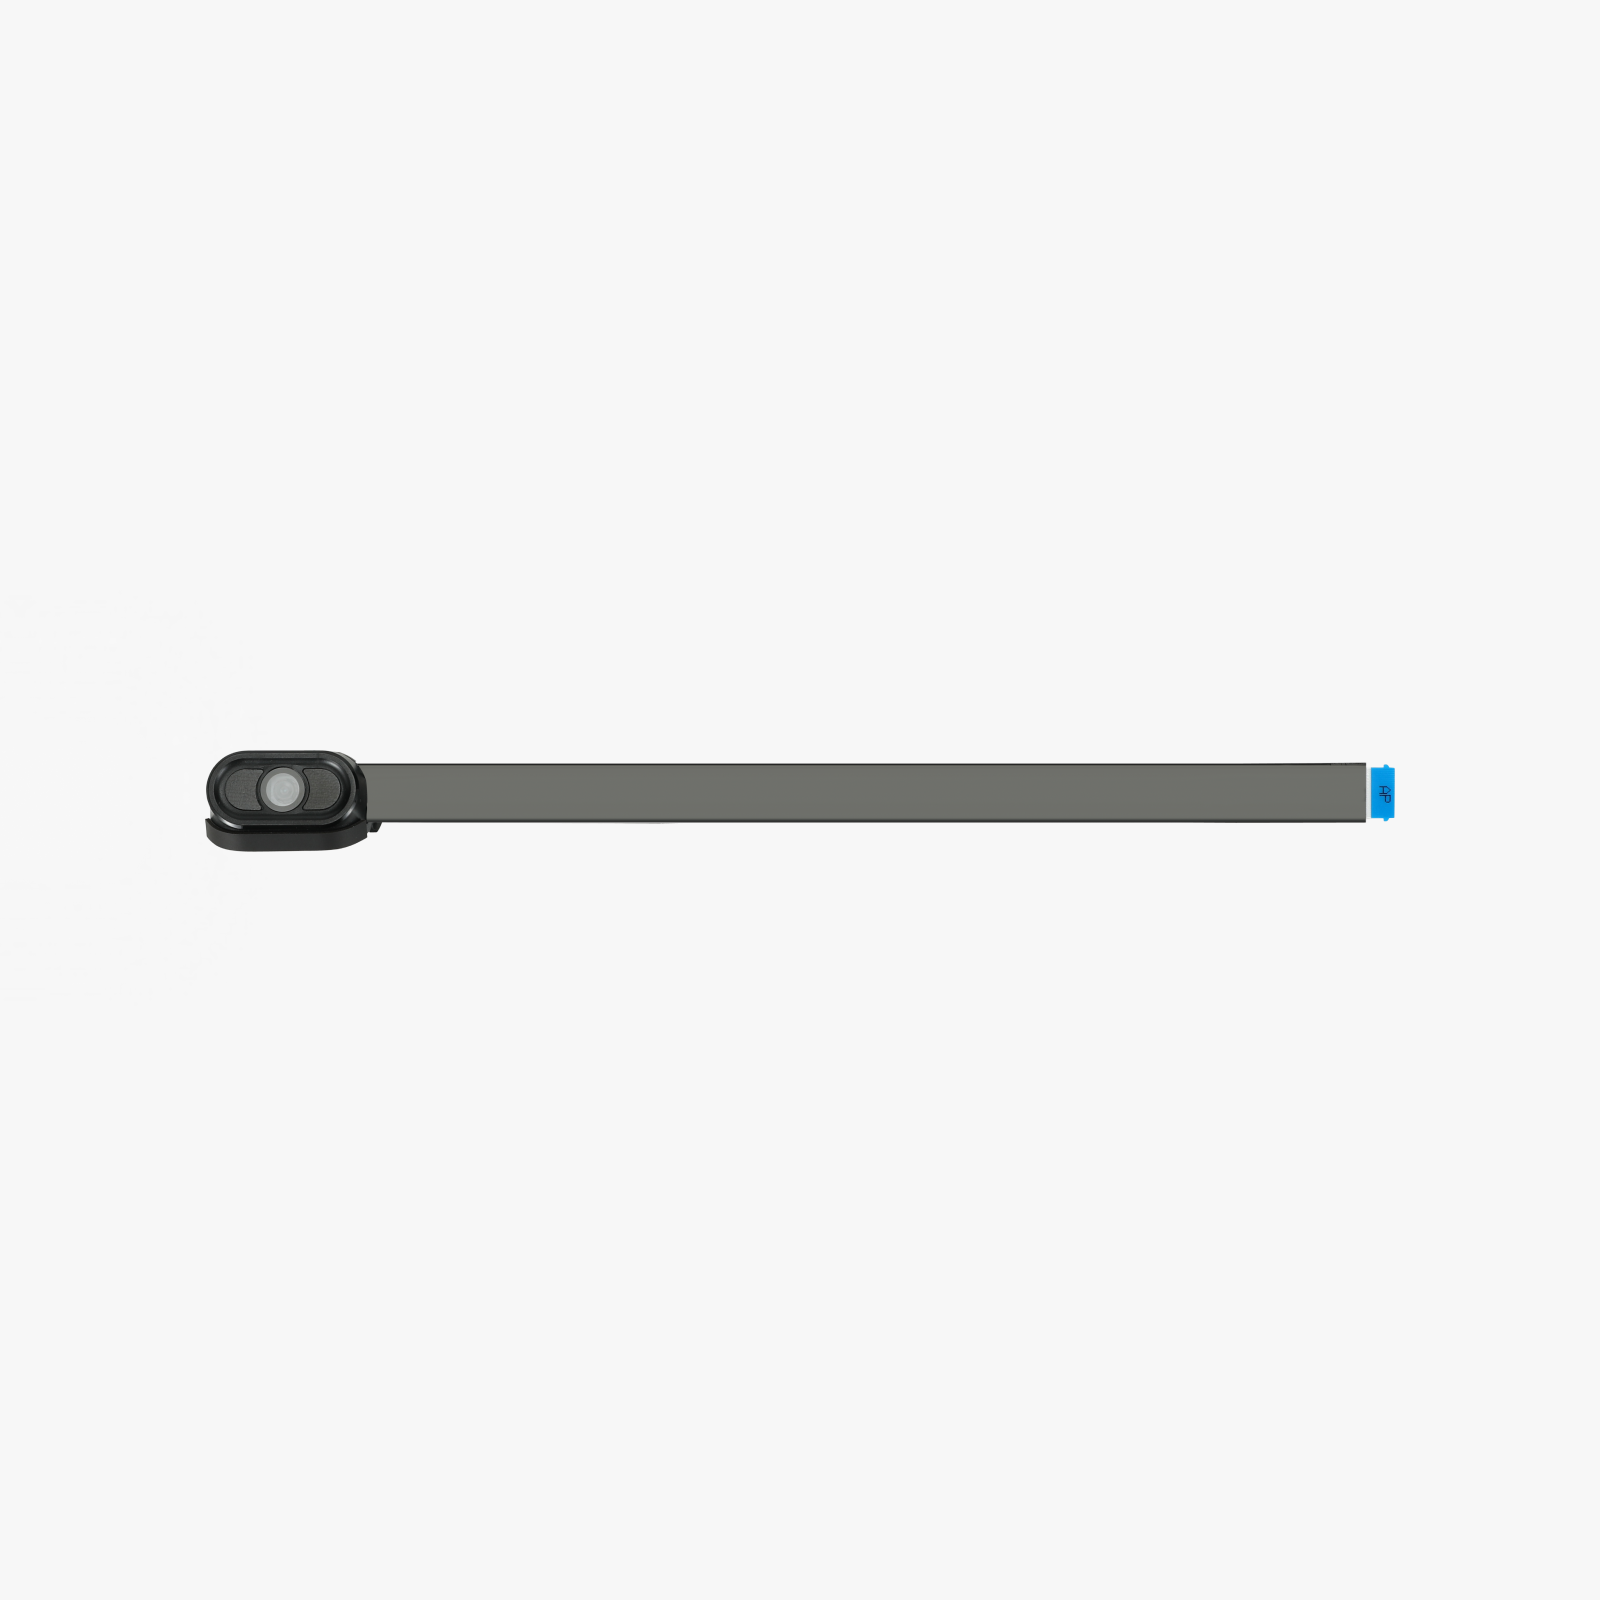
Birds Eye Camera-H2 Series
The Birds Eye Camera is installed on the inner side of the top frame.
In the Box
- Birds Eye Camera*1
Compatibility
H2 Series (Laser & Cutting)
Replace H2 Series BirdsEye Camera/BirdsEye Camera Cable
Learn how to replace the H2 series birdseye camera.
Note: This page uses the H2D machine as an example. The replacement steps are exactly the same for the H2S and H2C.
Birds Eye Camera
The BirdsEye Camera is mounted on the inner side of the printer's upper frame. The birdseye camera is only pre-installed in the H2DL, and is not pre-installed in the H2D.
The spare parts of birdseye camera include:
BirdsEye Camera × 1
BirdsEye Camera Cable × 1
When to use
The birdseye camera is broken.
Tools and Materials Needed
1.New birdseye camera
2.H1.5 Allen key or tweezers
3.H2.0 Allen key - only required when replacing the birdseye camera cable;
Safety Warning
IMPORTANT!
It's crucial to power off the printer before conducting any maintenance work, including work on the printer's electronics and tool head wires. Performing tasks with the printer on can result in a short circuit, leading to electronic damage and safety hazards.
During maintenance or troubleshooting, you may need to disassemble parts, including the hotend. This exposes wires and electrical components that could short circuit if they contact each other, other metal, or electronic components while the printer is still on. This can result in damage to the printer's electronics and additional issues.
Therefore, it's crucial to turn off the printer and disconnect it from the power source before conducting any maintenance. This prevents short circuits or damage to the printer's electronics, ensuring safe and effective maintenance.
Replace the BirdsEye Camera
Remove the BirdsEye Camera
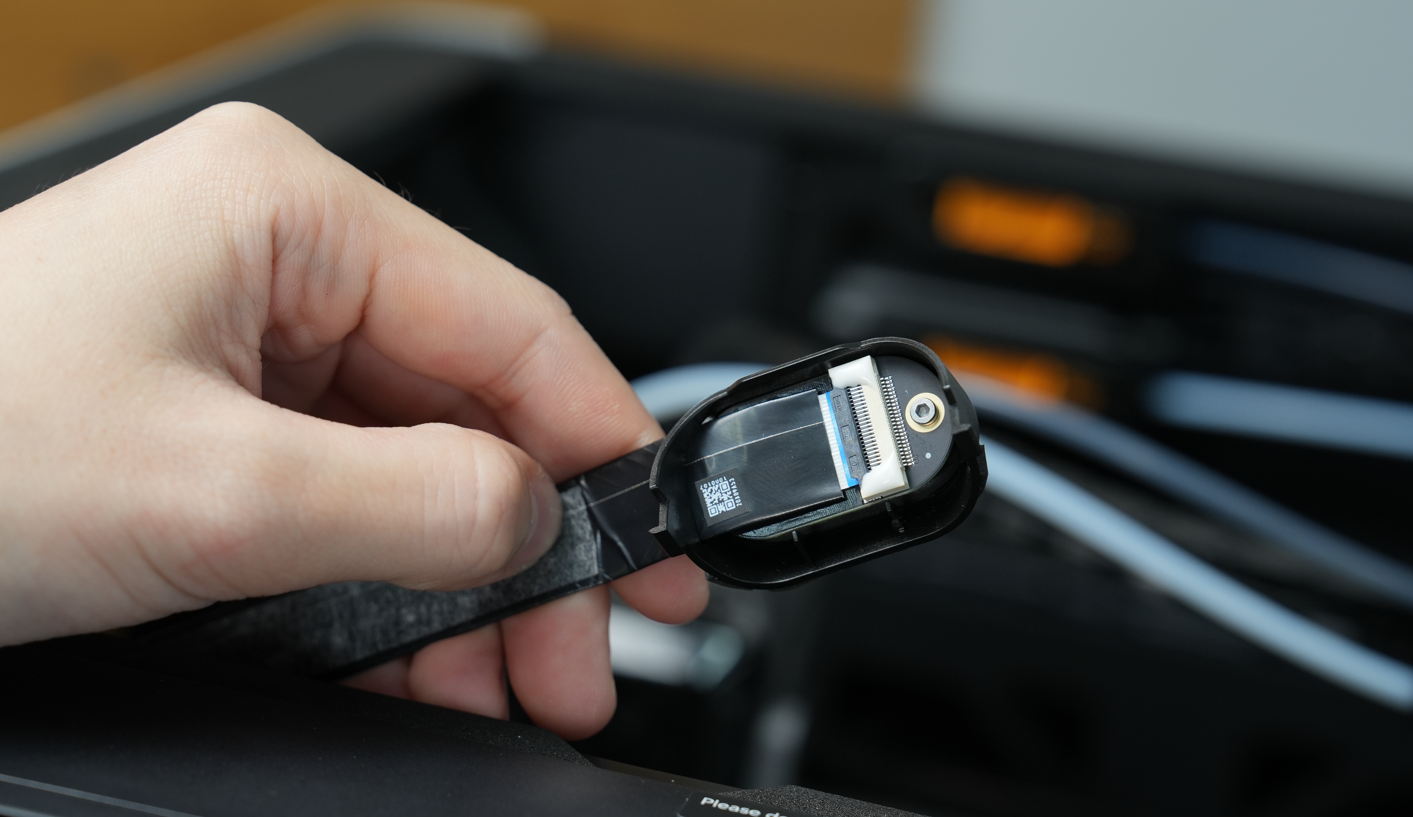
Step 1: Remove the BirdsEye Camera
The birdseye camera is fixed by clips. You can use an H1.5 Allen key or tweezers to pry out the clip on one side of the bird's-eye camera and remove it.
Step 2: Disconnect the BirdsEye Camera Cable
Unfasten the black buckle above the birdseye camera cable and then pull out the birdseye camera cable.

Install the BirdsEye Camera
Step 1: Connect the BirdsEye Camera Cable
Plug the birdseye camera cable on the printer into the interface on the camera and fasten the black buckle.
Step 2: Install the BirdsEye Camera
Use an Allen key to gently push the LED ribbon cable inwards to prevent it from being damaged when installing the camera.

Align the buckle of the birdseye camera cover with the groove on the printer, press the birdseye camera cover with a little force, and insert it into the printer.
Replace the BirdsEye Camera Cable
Remove the BirdsEye Camera Cable
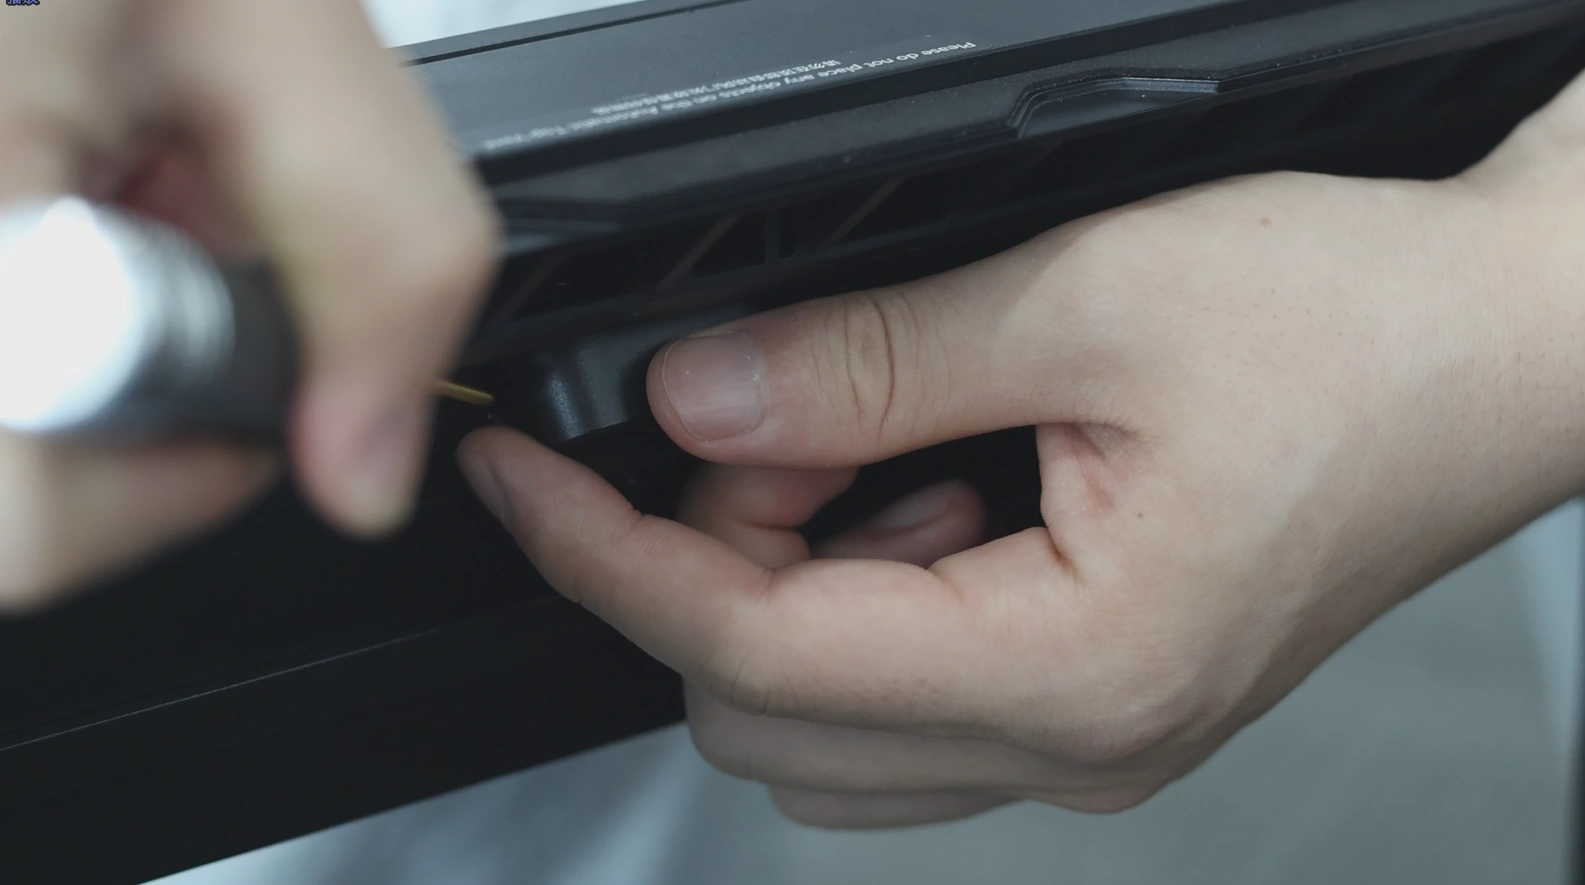
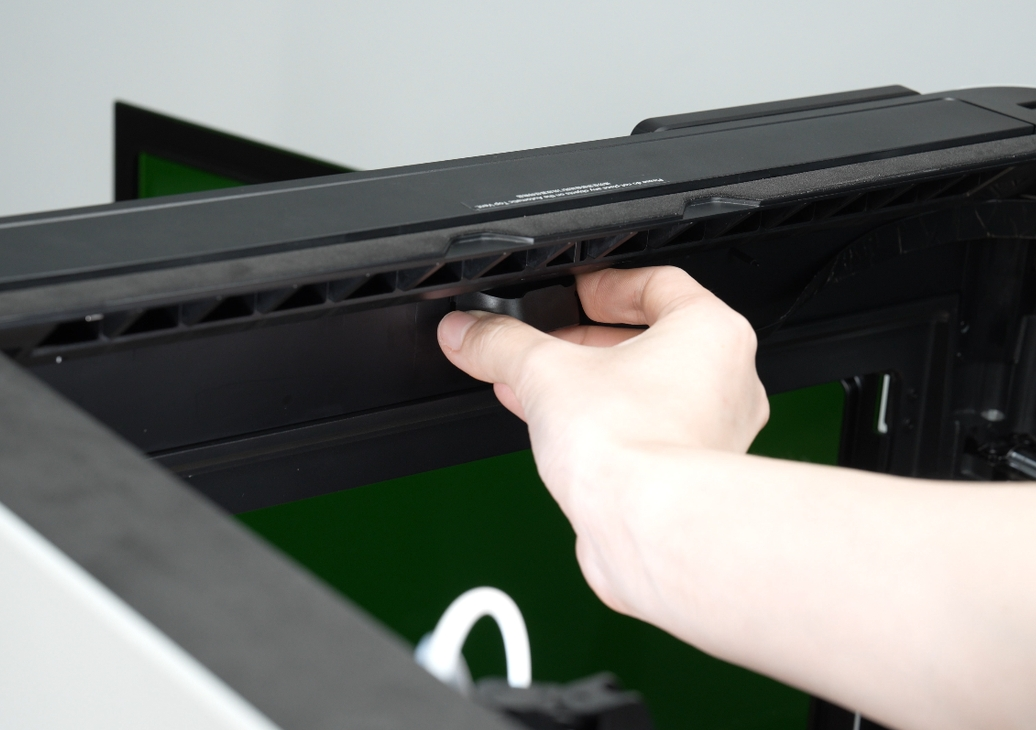
Step 1: Open the AP Board Cover
Use an H2.0 Allen key to remove one AP board cover fixing screw (BT2.6×8), and then open the AP board cover from the side close to the front door.

Step 2: Remove the BirdsEye Camera
The birdseye camera is secured by clips. Press the clips on both sides of the birdseye camera cover while gently flipping it downward to release.

Step 3: Remove the BirdsEye Camera Cable
Disconnect the birdseye camera cable from the AP board, then peel it off the upper frame and disconnect it from the birdseye camera.

Install the BirdsEye Camera Cable
Step 1: Connect the BirdsEye Camera and the camera cable
1.Connect the end of the cable without the "AP" label to the BirdsEye camera.
2.Use an Allen key to gently push the LED ribbon cable inwards to prevent it from being damaged when installing the camera.
3.Install the BirdsEye camera. Align the two side buckles on the camera housing with the two small grooves on the printer.

4. Gently press the camera housing upward until you hear a "click" sound, indicating it is securely installed.
.png)
5.Wipe the camera lens with a non-woven cloth to remove any dust.
.png) Attach the BirdsEye Camera Cable
Attach the BirdsEye Camera Cable
1.Remove one fixed screw from the AP board cover.
.png) 2. Open the AP board cover.
2. Open the AP board cover.
.png) 3. When routing the cable, avoid the chamber temperature sensor and the flame sensor (marked in red boxes below).
3. When routing the cable, avoid the chamber temperature sensor and the flame sensor (marked in red boxes below).
 Note: Apply continuous and firm pressure for about 30 seconds during attachment to ensure proper adhesion.
.png) 4.Peel off the sticker backing from the cable buckle.
4.Peel off the sticker backing from the cable buckle.
.png) 5.Align the buckle with the screw hole on the upper cover and stick it in place.
5.Align the buckle with the screw hole on the upper cover and stick it in place.
 Note: Apply continuous and firm pressure for about 15 seconds during attachment to ensure secure adhesion.
6.Install the second buckle in the middle section between the BirdsEye camera and the first buckle, then press it firmly into place.

7. Tighten the screw to secure the buckle.
 Step 3: Connect the camera cable to the AP Board
Open the black latch.
.png)
2.Route the camera cable behind the other wires and connect it to the AP board.
.png)
3. Press the latch firmly to lock it.
.png)
4.Close the AP board cover.
.png)
5.Tighten the fixed screw.

Verify the Functionality
Once the laser module is installed, you will be prompted to initialize the birdseye camera. Follow the on-screen instructions to complete the setup.
1.Enter the HMS page and click the "Begin Setup" button.
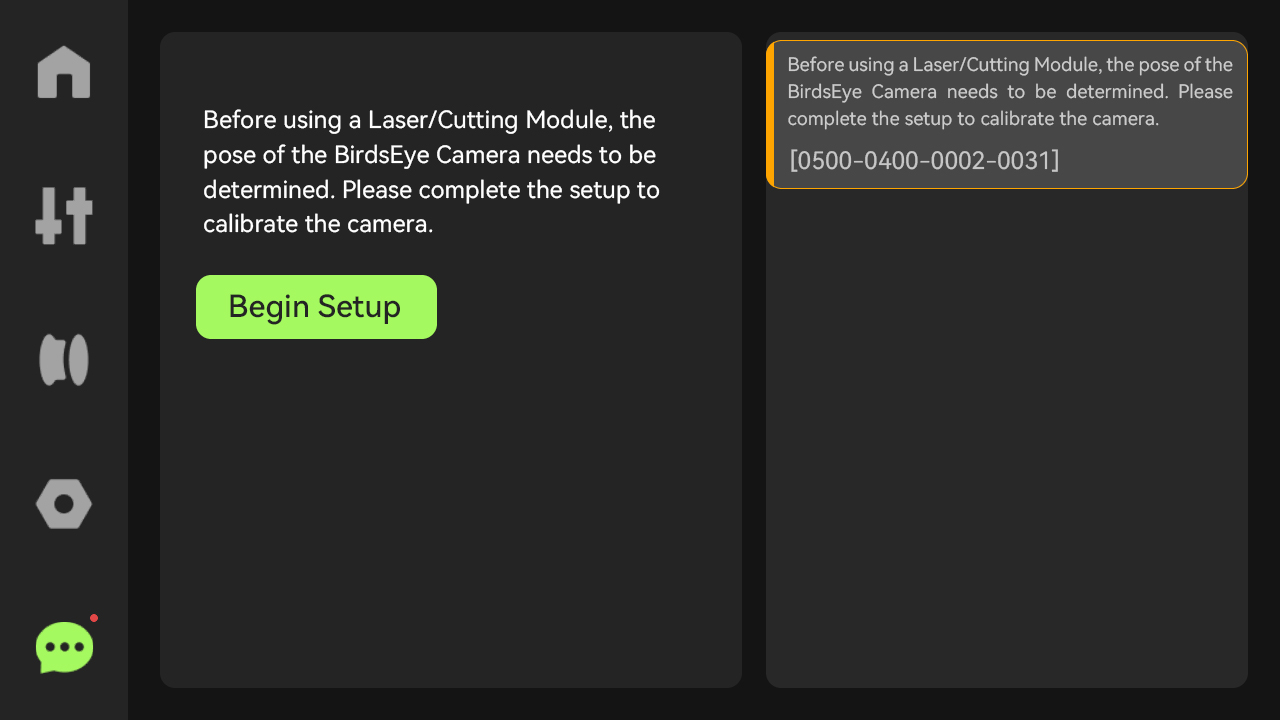
2.Alternatively, access it from the Toolbox page and select "BirdsEye Camera Begin Setup".