ANYCUBIC Kobra 3 Print Head
Couldn't load pickup availability
Use this text to encourage communication or promote sharing on social networks.
ANYCUBIC FDM 3D Printer Original Printhead Assembly Accessory for ANYCUBIC Kobra 3 /Kobra 3 Combo FDM 3D Printer
Compatibility:For Kobra 3, Kobra 3 Combo
Item Type:print head
Brand Name:ANYCUBIC
Kobra 3 Combo Printer head module Replacement
1. Caution
1. To replace the extruder, you need to unwind the print head. Wait until the print head cools down before replacing it.
2. Operate with the power off.
2. Tools
S1.5 Allen key*1
S2.5 Allen key*1
3. Disassembly step:
Step 1: Turn off the printer
Before making any replacement, make sure the printer is turned off and disconnected from the power source to ensure safe operation.
1. Click "Cool" to control the print head temperature below 50 degrees.

2. Turn off the power.

Step 2: Remove the module wiring and Teflon tube
1. Move the filament end back into the Teflon tube above the hub.

2. Use S1.5 Allen key to unscrew the fixing screw..

3. Plug the print head cable (orange Type-C long cable) upwards and pull it out of the groove above the print head.

4. Press the buckle (1) and pull the Teflon tube upwards (2).

Step 3: Disassemble the print head module
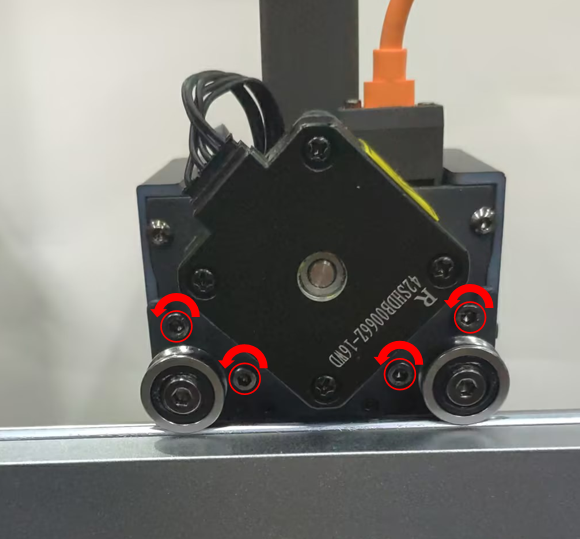
Use S2.5 Allen key to unscrew the 4PSC screws that secure the print head module.

4.installation step:
Step 1: Replace the print head module
Use S2.5 Allen key to tighten the 4PSC screws to fix the print head module.

Step 2: Install the print head cable and Teflon tube
1.Press the print head connection cable (orange type-long line) downward and insert it into the groove above the print head.

2. Use S1.5 Allen key to tighten the fixing screws.

3. Insert the Teflon tube back into the hub.

Step 3: Auto Leveling
After replacing the print head module, it needs to be re-leveled.

Click "Tools" - "Control" - "Auto Leveling".


