
PEI print beds have established themselves as the standard for 3D printer beds, evolving from the original PEI film with double-sided tape to various textures, including robust powder-coated ones and satin finishes.
In addition to the familiar PEI beds, there are now options labeled with terms like PET, PEO, PEY, and even H1H. These build plates put different hologram patterns on the bottom of your prints. Whether these new materials can live up to the promises and serve as proper replacements for PEI beds? The upcoming tests will assess their performance and explore any unique features, such as holographic effects.
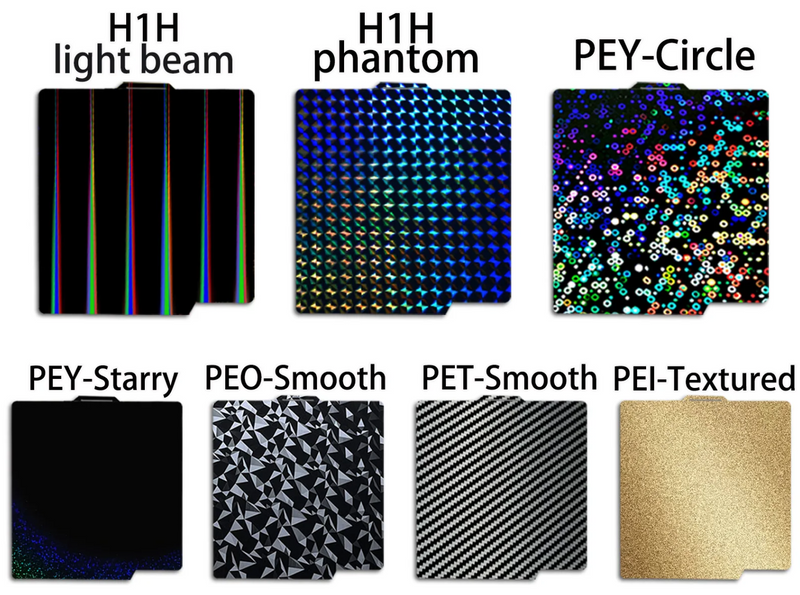
Table of Contents:[hide]
What is PEI, PEO, PEY, PET, PEX, H1H Build Plates?
Smooth & Texture PEI
PEI (Polyetherimide) sheet is a type of build surface commonly used in 3D printing. It's a thin, durable, and heat-resistant material that adheres well to most 3D printing filaments, particularly ABS and PLA. PEI beds can come with a smooth or a rough surface, or both. Both sides give good adhesion, but some people prefer one over the other. The rough side PEI gives a bit more grip. However, the smooth side gives you a smooth bottom to a print.
PEO Build Plate
PEO-PEI plate featuring textured PEI on one side and a unique PEO film on the other. PEO surface, exhibits a holographic pattern resembling hexagons when viewed against the light. The holographic circles create a shiny and appealing surface, with the promise of imprinting onto printed parts. The PEO side, suitable for PLA, TPU, and PETG filaments. 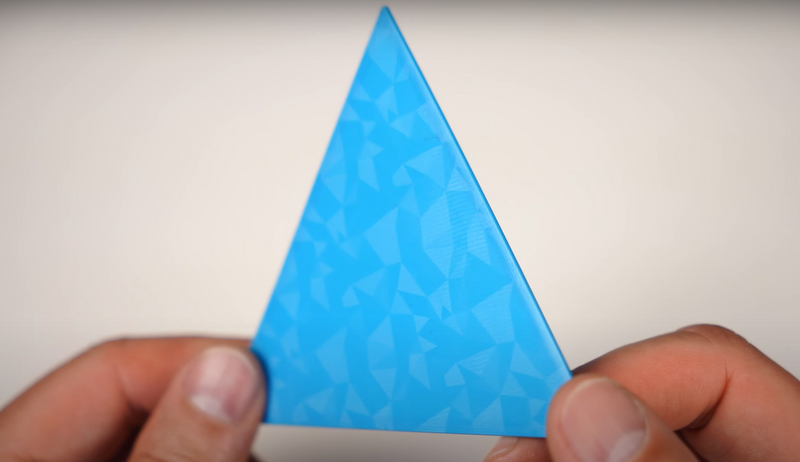 Cleaning it with IPA and a paper towel, much like other beds. The only drawback is that it doesn't self-release after cooling down. To remove a print, allowing it to cool and gently flexing it off is recommended. The triangular pattern transfers onto the underside of the model, creating a visually striking effect. This plate provides an aesthetic option without additional effort. The PEO plate performs excellently with PLA filaments. PETG adheres, though not as well as PLA. A brim helps improve PETG adhesion, ensuring a successful print. ASA, while not recommended.
PEY Build Plate
The smooth PEY sheet has a pattern of stars and dots that will shine brightly. Different colors will appear at different angles. What's more, different colors will be left on the printing model. 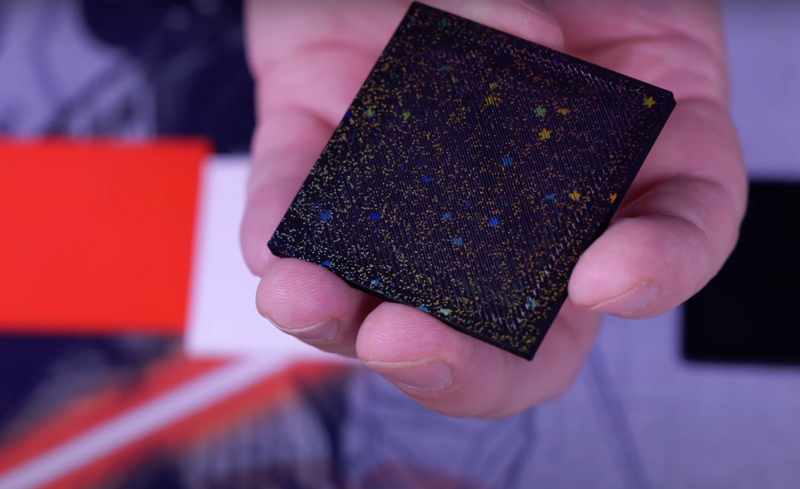
Print Test image from @ LenDizzle on YouTube
After our extensive testing, we recommend PEY to print PLA / TPU /PETG.(temperature suggestion: 50℃-70℃,≤90℃). H1H Build Plate The H1H build plate has two sizes with two different patterns. One side with a circle brushed stainless steel appearance, also displays a holographic texture. On the opposite side, it showcases what is referred to as the H1H pattern, characterized by long stripes. 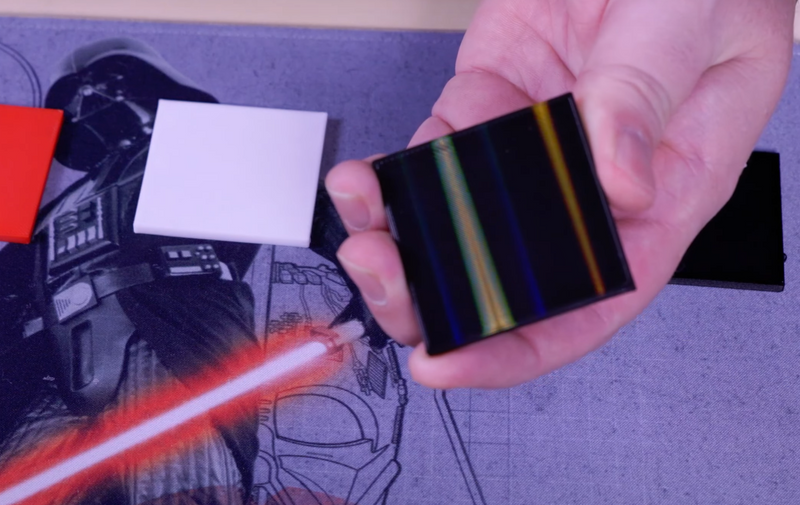
Long Stripes Pattern on print bottom, image from @ LenDizzle on YouTube
The H1H print bed surface is resistant to high temperatures of 200°C. After our extensive testing, we recommend the H1H build plate to print PLA / PETG / TPU / ABS. The third bed featuring a repetitive polygon pattern that could complement low-poly prints.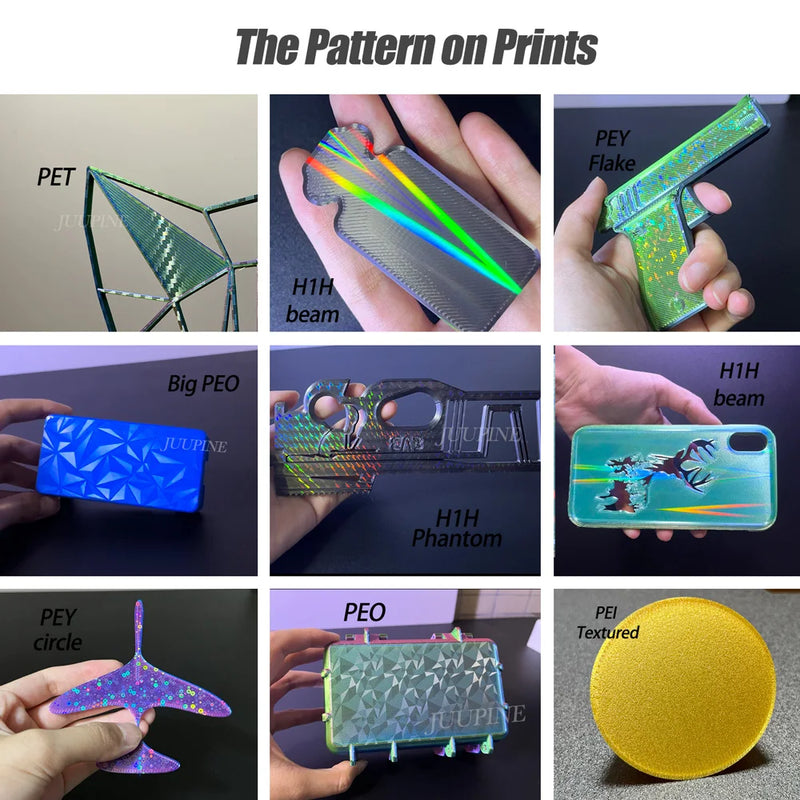
PET Build Plate
PET build plate presents a faux carbon fiber surface, offering a distinct visual appeal. While real carbon fiber resin impregnated beds exist, this particular one is a film, contributing to its artificial appearance.
The PET print bed surface is resistant to high temperature 120℃ and the PEI coating bed is 260℃. PET build plate surface only prints PLA filament, while PEI surface plates print most filaments like PLA/ABS/PETG/TPU/Nylon. Despite the varied surface designs, all these beds seem to share a commonality in having a fairly smooth PI coating on one side, with a light peel. 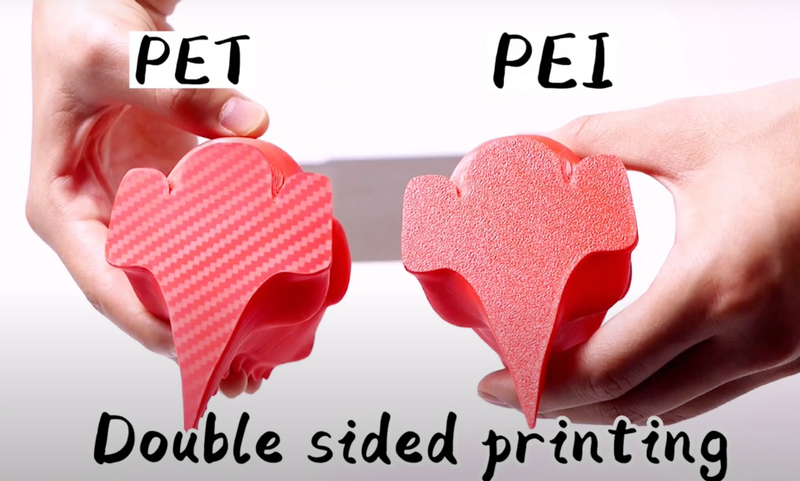
Why PEI sheets are Popular in 3D Printing?
- Adhesion: PEI has excellent adhesion properties, which means that when the print bed is heated, the first layer of filament adheres firmly to the surface, preventing warping and ensuring a successful print.
- Durability: PEI sheets are tough and resistant to wear, making them suitable for multiple prints without needing frequent replacement.
- Compatibility: PEI works well with a wide range of filament materials, including ABS, PLA, PETG, and more. This versatility makes it a popular choice among 3D printing enthusiasts.
- Ease of Use: PEI sheets are relatively easy to install and maintain. They can be cleaned with isopropyl alcohol or other mild solvents to remove any residue left from previous prints.
- Heat Resistance: PEI can withstand high temperatures without deforming or losing its adhesive properties, making it suitable for printing materials that require elevated bed temperatures.
Overall, PEI sheets are valued for their reliability, adhesion properties, and compatibility with various filament materials, making them a preferred choice for many 3D printing enthusiasts and professionals.
Disadvantages of PEI Sheet You Should Know
1. Fragility: PEI sheets can be scratched or damaged by sharp objects or mishandling. Even though they are durable, care must be taken to prevent damage, as scratches or dents can affect print quality and may necessitate replacement of the sheet.
2. Preparation: PEI sheets require proper preparation before use to ensure optimal adhesion. This typically involves cleaning the surface with isopropyl alcohol and sometimes applying additional adhesives like glue stick or hairspray, particularly for filaments like PETG. This extra preparation step can add time and effort to the printing process.
3. Print Removal: While PEI sheets offer good adhesion during printing, removing completed prints can sometimes be challenging, especially for larger or intricate models. Care must be taken during removal to avoid damaging the print or the PEI surface. This extra care and effort required for print removal can be inconvenient for users.
PEI Setup & Installation
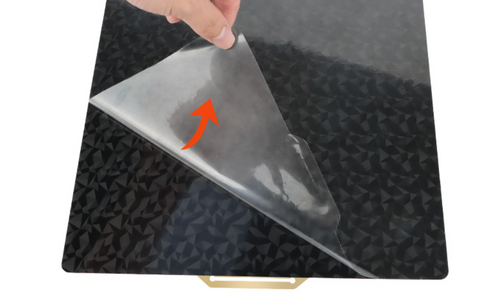
The installation process begins with the spring steel bed, and the first step involves attaching the magnet material. The material comes with adhesive on the back, making it easy to affix to the magnetic front of the bed. Peeling a corner and aligning the front is considered the best approach, prioritizing aesthetics. The next step involves installing a PEO-PEI sheet. Before print, wipe the beds down with denatured alcohol and finished cleaning with water to eliminate any production residue. The leveling process requires a bit of effort to correct the Z offset due to the thinner material. However, the printer is now ready to operate with the new bed.
Build Plate Size for Your 3D Printers
The following are build plate sizes for some popular 3D printers for your reference. Pls noted some brand note the print size of their 3D printers normally a little bit smaller than the build plate size. While for the PEI / PEO / PEY sheets, you need to buy the extract size of the printers' build plate size. To ensure you get the right one, measure your bed and compare these measurements to any new one you plan to buy.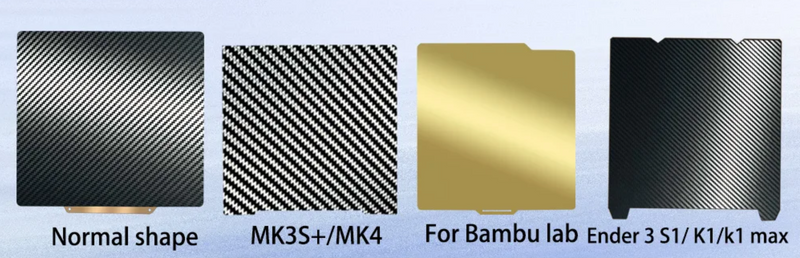
| PEI Sheet Build Plate Size | 3D Printers |
|---|---|
| 180x180mm 7.09x7.09inch |
Kingroon KP3S, Prusa Mini, Prusa Mini+ |
| 210x210mm | Prusa i3 MK3S+, Kingroon KP3S Pro, Kingroon KP3S Pro S1, Kingroon KP3S Pro V2 |
| 220mm×220mm 12.2x12.2inch |
Prusa MK2/MK2A/MK3, Anet A8, Anet A6, Reprap, Mendel, Wanhao Duplicator 13, Monoprice Maker, not suitable for Ender 3,5 |
| 235mmx235mm 9.25x9.25 inch |
Creality Ender 3/Ender 3 S1/ Ender 3 Pro/ Ender 3S/ Ender 3 v2/ CR 20/CR 20 Pro /Ender 5/Ender 5 Pro/K1, Voxelab Aquila, Geeetech A10 series, Artillery Genius, BIQU-B1, FOKOOS Odin-5 F3 |
| 214mm×275mm 8.4×10.8 inch |
Flying Bear Ghost 5 |
| 230mm×257mm 9.05×10.12 inch |
Flying Bear Ghost 6 |
| 241mm×253.8mm 9.49×9.99 inch |
Prusa i3 Mk3S+/MK4 |
| 257mm×257mm 10.12×10.12 inch |
Bambu Lab P1P, Bambu Lab X1-Carbon, Bambu Lab P1S, Bambu Lab P1P |
| 300x300mm 11.81x11.81inch |
Qidi X-Max |
| 310mm×310mm 12.2×12.2inch |
Artillery SW-X1/SW-X2, Creality CR-10/CR10S, Two Trees SP-5, BLU-5, Tevo Tornado/Nereus, Anet A8 Plus/E12 or other same size heated bed |
| 310x320mm | Kingroon KP5L |
| 350mm×350mm 13.77×13.77 inch |
Voron 2.4, Creality Ender 5 Plus |
How to Clean PEI Plate?
Cleaning PEI plate is essential for maintaining good print quality and lasting the use time of the sheet. Here's how you can clean a PEI plate:
- Remove the Plate: If possible, remove the PEI plate from the 3D printer bed to clean it more effectively.
- Scrape Off Residue: Use a plastic scraper or spatula to gently scrape off any excess filament or residue stuck to the surface. Be careful not to scratch the PEI sheet.
- Warm Soapy Water: Prepare a solution of warm water and a mild detergent or dish soap. Dip a soft cloth or sponge into the soapy water and gently wipe the PEI surface to remove any remaining debris or fingerprints.
- Rinse Thoroughly: After cleaning, rinse the PEI plate with clean water to remove any soap residue.
- Dry Completely: Use a dry, lint-free cloth to thoroughly dry the PEI plate. Ensure that no moisture remains on the surface before reinstalling it on the printer bed.
- Isopropyl Alcohol (Optional): If there are stubborn residues or oils on the PEI surface, you can wipe it down with isopropyl alcohol (IPA). Make sure to use a high concentration (at least 90%) and apply it sparingly.
- Avoid Abrasive Cleaners: Avoid using abrasive cleaners or rough materials like steel wool, as they can scratch or damage the PEI surface, affecting print adhesion.
- Regular Maintenance: It's a good idea to clean your PEI plate regularly, especially if you notice a decrease in print quality or adhesion.
Routine maintenance will help prolong the life of the PEI surface and ensure consistent printing results.Following these steps should help you keep your PEI plate clean and in good condition for 3D printing.
Suggest Filaments Temperature with PEI Sheet
PEI bed surface is resistant to high temperature 260℃. The H1H print bed surface is resistant to high temperatures of 200°C. After our extensive testing, we recommend the H1H build plate to print PLA /PETG /TPU /ABS. While PEO, PET, PEY bed surface is resistant to temperature to 120℃. High-temp filaments, like ABS, PA, PC, etc can be used on PEI, H1H build plates, but not suggest to use on PEO, PET, PEY build plate. For PEO / PET /PEY plate we suggest PLA, TPU, PETG. The corresponding build plate temperature of PEO / PET / PEY:
- PLA/TPU: 50-70℃;
- PETG: 70-80℃.
PEI surface can prints PLA, PETG, ABS, TPU, ASA, PVA, PET, PA, PC etc. If printing high-temperature filaments such as ABS, it is recommended to seal the box for printing or apply glue on the hot bed to assist with adhesion. The recommend temperature of PEI / H1H side:
- PLA/TPU: 50-60℃;
- PETG: 70-80℃;
- ABS: 80-100℃.
Start printing, the temperature of PEO / PET / PEY hot bed can be set to 40°C-80°C according to the actual situation (do not exceed 80°C).
| Surface Temp Resistance | Suggest Filaments | Surface | |
|---|---|---|---|
| PEI | Up to 260℃ | PLA, PETG, TPU, ABS, ASA, PVA, PET, PA, PC, Nylon, Nylon-CF etc. | Smooth / Texture |
| PEO | Up to 120℃ | PLA, PETG, TPU | Smooth |
| PET | Up to 120℃ | PLA, PETG, TPU | Smooth |
| PEY | Up to 120℃ | PLA, PETG, TPU | Smooth |
| H1H | Up to 200℃ | PLA, PETG, TPU, ABS | Smooth |
PEI, PEO, PEY, PET, PEX Build Plates Using Tips
- For the first printing, it must be leveled (the distance between the nozzle and the hot bed is generally A4 paper thickness).
- Tear off the adhesive on the base of the magnetic sticker and stick it on the hot bed platform, pay attention to be flat and do not leave air bubbles.
-
There is a film in PEO/PET/PEY/Smooth PEI side, please remove it before using the build plate.
- Adsorb PEI side, PET side, or the PEO side spring steel plate on the magnetic base.
- The hot bed temperature must drop to room temperature before removing the prints, otherwise it is easy to cause the printing film to tear and fall off. The small prints can be taken off directly by hand, the large prints need to bent spring steel plate by hand and removed without other tools.
Mulitple Build Plates Holder
The Build Plate Stand designed to vertically store several spare build plates. The stand holder design from @PrinttX, available on Printables have sizes of all Bambu Lab printer models, including A1 Mini.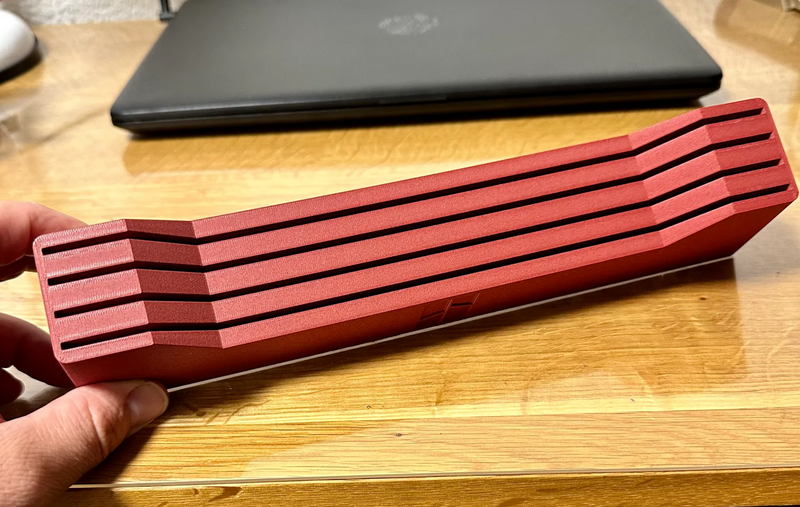
5 comments
Michael Flynn, the temperature of the build plate just needs to be warm enough to keep the plastic from contracting due to cooling. That temperature is significantly lower than the one required to make the plastic flow.
Nylon/PA adheres to glue, so not necessarily to a particular surface (with exception to cellulose). It will not adhere to PEI on its own. Nylon is better suited to adhering to cellulose build plates such as Garotte. Also since Nylon can exert up to 43Kpsi on the build plate, spring steel is not ideal. Alloy Steel is better suited for this purpose.
I immediately had exactly the same concerns as other people commenting here when I read the supported temperature… if these surfaces are designed to support 120°C they cannot last long because even if you set the temperature to 60°C the material extruded on it has temperatures well above 200°C, which will degrade these surfaces. PS: Here H1H is listed up to 200°C but the shops that sell them have indicated 110-120°C even for H1H while for the “classic” PEI it is listed up to 300°C.
@Michael Flynn
printer prints PLA at 220 Celsius is nozzle temperature.
build plate supports 120 is heatbed temperature.
I’m confused. My printer prints PLA at 220 Celsius. If the build plate can only support 120, how does it support PLA?