
Kate.G - May 11 2024
Mastering the Flsun Speeder Pad: A Comprehensive Guide on KINGROON KP3S and other Third-party Printers

Are you ready to unlock the full potential of your KINGROON 3D printer with the FlSun Speed Pad? In this detailed guide, we'll take you through the step-by-step process of setting up and utilizing the FlSun Speed Pad on your KINGROON machine. Whether you're a beginner looking to enhance your printing experience or a seasoned user seeking to optimize your workflow, this guide is designed to help you make the most of this innovative accessory. Let’s take the Kingroon KP3S 3D printer as an example.
Understanding the FlSun Speed Pad and its Features
Step 1 Unboxing Flsun Speeder Pad
After unboxing the Speeder Pad, you will find only a few items, including the Speeder Pad and its power supply, an accelerometer accompanied by a USB cable, which is used to measure input shaping, and the user manual. Connect the pad to the power, it will turn on automatically.

The user manual will show you some basics to use this pad, don’t miss this out.
Then, check Klipper's configuration files for the .cfg file corresponding to your printer. This file will indicate if the Speeder pad is suitable for your printer based on its processor chip. You can find Klipper's GitHub configuration list for a comprehensive overview of various printers, including details about their boards, processor chips, and other necessary information for setting up a third-party printer.
Klipper config files:
https://github.com/Klipper3d/klipper/tree/master/config

According to the chip information, you should choose type “d” for your KINGROON KP3S. Then you need to connect the pad to the local Wi-Fi.

After that, your pad will get a local IP address. Use that to enter the Klipper dashboard.

Then your Pad should be ready to use. The next thing is to prepare your printer.
Step 2 Prepare Your KINGROON 3D Printers
Click this link to get the Klipper bundles for your model. You will be redirected to our Klipper tutorial. We will update the information in it. Scroll down to the bottom, you will find the bundles. Choose and download one.

Then copy the firmware files into the SD card and reboot the printer to flash it.

Normally the screen turns off when the flashing is finished. If anything wrong happens click this link to flash the stock firmware.
Then the SpeederPad should be able to connect to the printer.
Step 3 Prepare the configuration files
Go to the dashboard, then rename the “printer.cfg” to deactivate it, we are going to use our own files instead. You can delete it or modify it, too.

After that, update the configuration fines you got from the bundle. You should be able to control the KP3S Pro then.

In case anything went wrong, click “home all” and see if everything is OK. You can operate the printer both on the dashboard and the Pad.

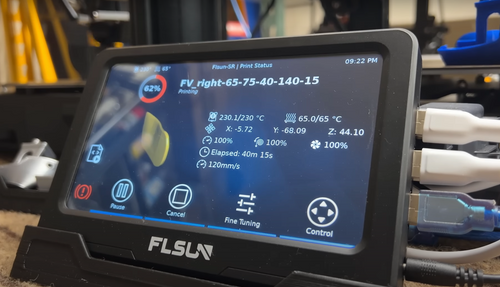
Next, you can upload the G-codes and start your first print. If you haven’t sliced any files yet, start with our files in the bundle. There are two necessary test objects in it.

Then you can start print.

With the Klipper Screen Interface, controlling your printer and using the Klipper firmware is really easy.
It has no big difference from normal printing, but you can tune your printer much easier from now on.After fine-tuning, printing faster and well become possible. Even if you print at normal speed, the print quality will also get improved.

Step 4 Tuning and Further setup
So, your SpeederPad is all set now. For non-Flsun printers, the input shaper, Resonance Compensation, and pressure advance are not pre-calibrated. Therefore, you need to manually calibrate them using the accelerometer provided with the Speeder Pad.

To do that, you need to modify the “input shaper” settings in the “printer.cfg” for the Resonance Compensation and the “Pressure Advance”in the “extruder.cfg” for the Pressure Advance.
For more information please check the official website:
Resonance Compensation: https://www.klipper3d.org/Resonance_Compensation.html
Pressure advance: https://www.klipper3d.org/Pressure_Advance.html
For beginners, you can also stick with the original files we provided because the basic settings have been made, and you should be able to get good print quality. Also, we will keep those files updated, just getting the latest one, you should be fine.
Tutorials for setting up the Resonance Compensation and the Pressure advance in the Klipper firmware will be available soon.
Next is adding a webcam. For those who have a USB webcam, it’s a great time to take great advantage of it.
Just put the USB port in the SpeederPad, and you are ready to use it.

And a webcam is so useful, it not only helps you monitor the printing but also can make time-lapse videos. Make sure to get one at least 1080P. We are going to make a tutorial to show you how to setup time-lapse in the Klipper Firmware in the future.

That’s all for today. Hope you all enjoy the 3D printing and have a great time. If you haven’t got a Flsun Speeder Pad, it is now a good time.